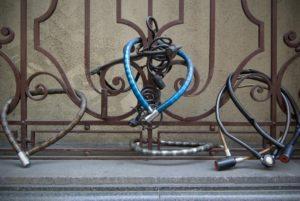
Welcome to our comprehensive guide on bike tools and their uses, ranging from the basic necessities every cyclist should have to advanced tools for specialized bike repairs and maintenance. Whether you’re a seasoned cyclist or just starting your biking journey, having the right tools and knowing how to use them can make a significant difference in your biking experience.
In this article, we’ll walk you through a list of essential bike tools, explain their functions, and provide insights into basic and advanced bike repairs and maintenance. By the end, you’ll be well-equipped to tackle common bike issues and keep your two-wheeled companion in top condition for many rides to come.
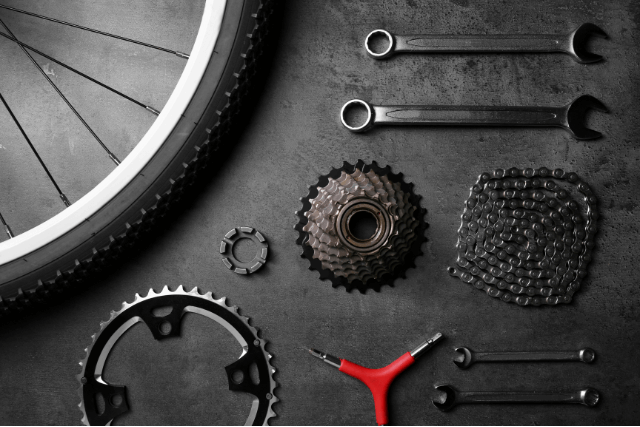
Importance of Bike Tools
Bike tools are the unsung heroes for cyclists of all levels. They are not just convenient accessories but vital instruments that can make the difference between a smooth, enjoyable ride and a frustrating experience marred by unexpected breakdowns. These tools empower riders to perform routine maintenance, fix minor issues on the go, and even undertake more complex repairs if needed.
By carrying the right tools and having the knowledge to use them effectively, cyclists gain independence and the ability to handle various situations that may arise during their rides. This knowledge also contributes to safer and more enjoyable biking adventures, making bike tools an essential investment for any rider.

In the following sections, we’ll delve into the world of bike tools, starting with the basics and progressing to more advanced options, providing you with valuable insights into their uses and benefits.
Essential Basic Bike Tools
Tire Levers
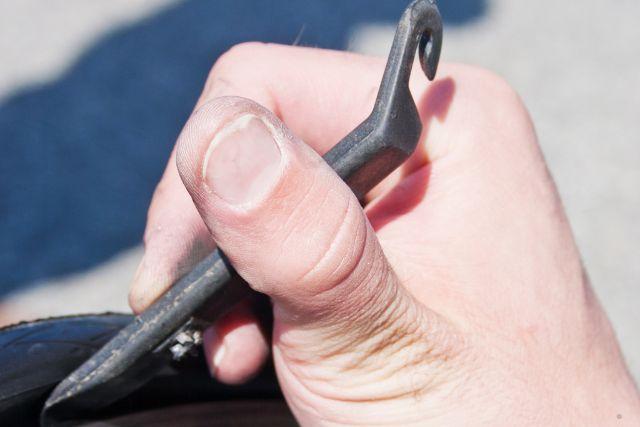
Tire levers are a fundamental tool for any cyclist, whether you’re a newbie or a seasoned rider. These simple yet effective tools play a critical role in helping you remove and replace bicycle tires when you encounter a flat or need to perform routine maintenance.
In this section, we’ll delve into tire levers, exploring their importance, how to use them correctly, and why having them in your toolkit is essential for every cyclist. Whether you’re a road cyclist, mountain biker, or urban commuter, knowing how to handle tire levers is a skill that can save you from being stuck with a punctured tire during your rides.
Bike Pump
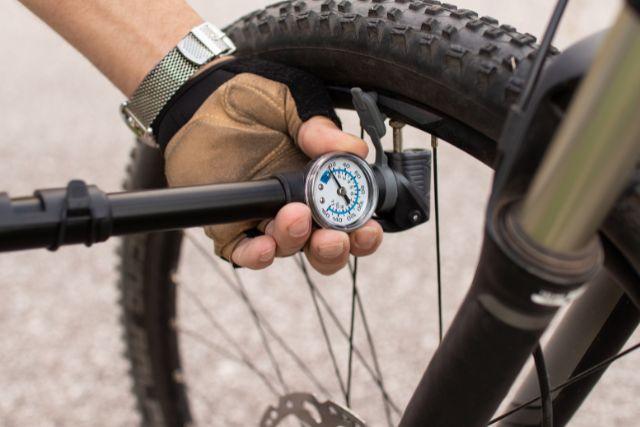
A bike pump is a quintessential tool for any cyclist, regardless of your riding style or experience level. It’s one of those items that you hope you won’t need too often, but when you do, it becomes indispensable. In this section, we’ll explore the importance of a bike pump, the different types available, and how to use them effectively.
Whether you’re a casual rider or a dedicated cyclist, knowing your way around a bike pump is essential for maintaining the right tire pressure and ensuring a smooth, efficient, and safe ride. So let’s dive into the world of bike pumps and discover why they are a must-have tool for every cyclist.
Multi-Tool
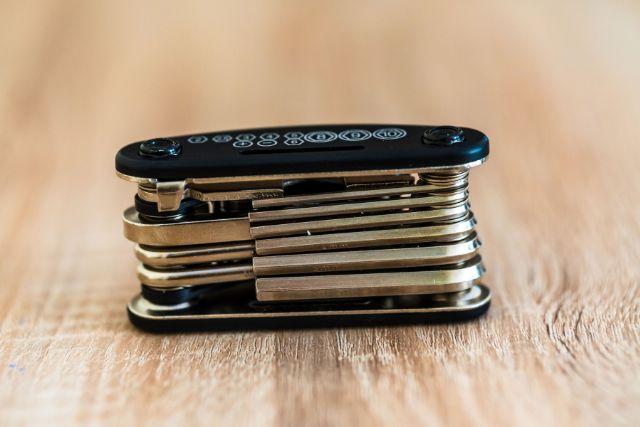
A multi-tool is like a Swiss Army knife for your bike, offering a compact and versatile solution to various on-the-road or trailside issues. It’s a handy device that combines several essential tools into one, providing cyclists with the means to tackle common maintenance and repair tasks while out riding.
In this section, we’ll delve into the significance of a multi-tool for cyclists, detailing its components and functionalities. Whether you’re a seasoned rider or just starting, having a multi-tool in your kit can be a game-changer, ensuring that you’re prepared to handle unexpected situations and keep your bike running smoothly.
Patch Kit
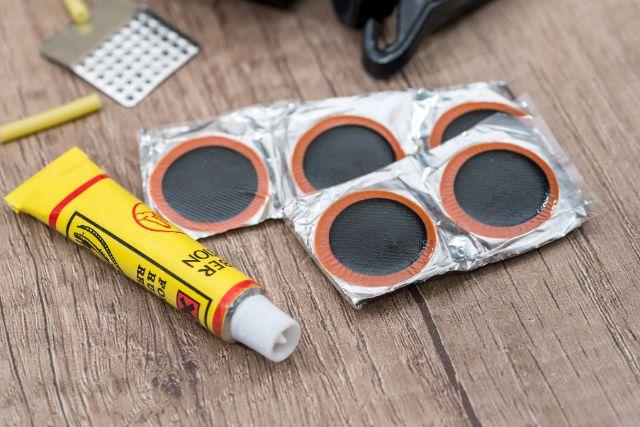
A patch kit is a small yet vital component in any cyclist’s toolbox, as it comes to the rescue when you’re faced with a flat tire during your ride. These compact kits contain the necessary materials to patch up a punctured inner tube, allowing you to get back on your bike and continue your journey without having to replace the tube entirely.
Whether you’re a casual rider or a dedicated cyclist, knowing how to repair a flat tire using a patch kit is a valuable skill that can save you time, money, and the frustration of a disrupted ride.
Chain Breaker
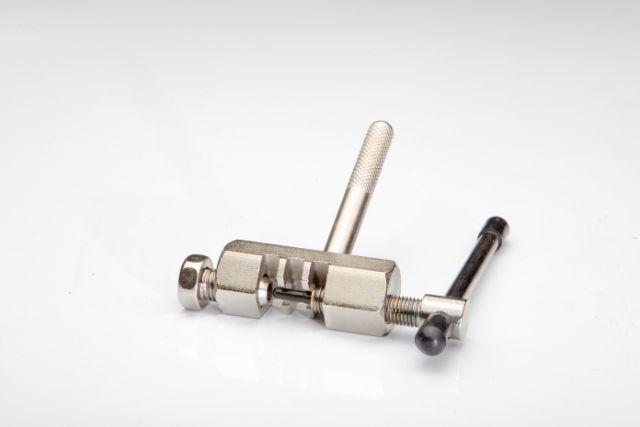
A chain breaker is an indispensable tool for cyclists, facilitating the removal and replacement of a bicycle chain with ease. It allows you to efficiently disassemble and reassemble your chain, making it essential for addressing common chain problems encountered while cycling.
Whether you need to repair a broken chain, adjust its length, or replace it entirely, a chain breaker simplifies the process.
Tire Pressure Gauge
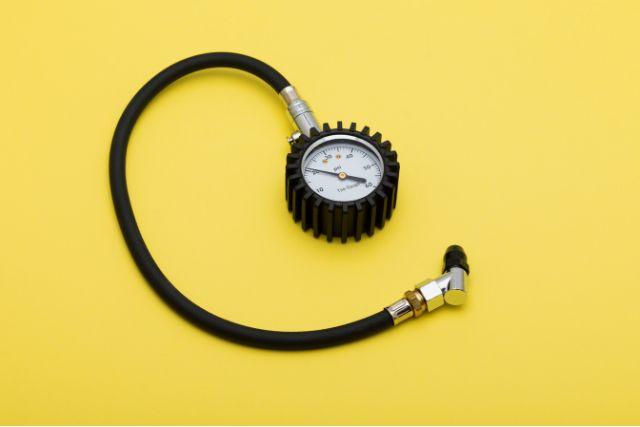
A tire pressure gauge is a vital tool for cyclists to maintain safe and efficient rides. Here’s an overview:
Types of Gauges: Tire pressure gauges come in analog and digital versions. Digital gauges offer greater accuracy and ease of reading, while analog ones are simpler but may vary in accuracy.
Choosing the Right Gauge: Consider accuracy, ease of use, durability, pressure range, portability, and any extra features when selecting a gauge.
Using a Gauge: To check your tire pressure, remove the valve cap, press the gauge onto the valve stem, read the pressure (either digitally or by needle position), adjust the pressure if needed, and replace the valve cap.
By regularly monitoring and adjusting your tire pressure with a reliable gauge, you’ll ensure safer and more efficient cycling experiences.
Basic Bike Repair and Maintenance
How to Use Tire Levers
Using tire levers is an essential skill for cyclists. Here’s a condensed guide:
Why You Need Tire Levers: Tire levers help you remove a tire from the rim without damaging the tube or tire, making it crucial for fixing flats.
Selecting the Right Tire Levers: Choose durable and ergonomic levers designed for bike tires. Plastic or composite levers are common for their lightweight and gentle handling.
Step-by-Step Tire Lever Use:
- Deflate the tire by pressing the valve.
- Insert the curved end of one lever under the tire bead near the rim edge.
- Hook the other end of the lever onto a spoke to secure it in place.
- Insert a second lever a few inches away from the first.
- Slide the second lever along the rim’s edge, gently lifting the tire bead over the rim.
- Work your way around the tire, keeping the bead on the opposite side of the rim well.
- Once one side is off, remove the inner tube or fix the flat as needed.
- To reinstall the tire, start at the valve and work your way around, using the levers to guide the tire bead back onto the rim.
Remember, practice makes perfect, and using tire levers correctly will help you efficiently address flat tires while cycling.
Inflating Tires with a Bike Pump
Inflating tires with a bike pump is a fundamental skill for cyclists. Here’s a condensed guide:
Why You Need a Bike Pump: Proper tire pressure ensures a smooth and efficient ride while preventing flats. A bike pump is your go-to tool for maintaining tire pressure.
Selecting the Right Bike Pump: Choose a pump compatible with your valve type (Presta or Schrader). Floor pumps are ideal for home use, while mini pumps are portable for on-the-go inflation.
Step-by-Step Pump Use:
- Determine the recommended tire pressure (usually printed on the tire sidewall).
- Unscrew the valve cap and press the pump head onto the valve firmly.
- Lock the pump head onto the valve (if your pump has a lever or switch).
- Begin pumping, using smooth and consistent strokes.
- Monitor the pressure on the gauge (if your pump has one) and stop once you reach the desired pressure.
- Carefully unlock and remove the pump head from the valve.
- Reattach the valve cap.
Keep in mind that maintaining proper tire pressure enhances your bike’s performance and minimizes the risk of flats. Practice using a bike pump to confidently inflate your tires as needed.
Making Basic Repairs with a Multi-Tool
A multi-tool is a cyclist’s Swiss Army knife, capable of handling various repairs on the go. Here’s a condensed guide on using a multi-tool for basic repairs:
Why a Multi-Tool is Essential: Multi-tools combine various essential tools into one compact device, making them perfect for quick fixes during rides.
Selecting the Right Multi-Tool: Look for one with the necessary functions, such as Allen wrenches, screwdrivers, and a chain breaker, suited for your bike’s components.
Basic Repairs with a Multi-Tool:
- Adjusting Bolts: Use Allen wrenches to tighten or loosen bolts on components like your handlebars, saddle, or brakes.
- Fixing a Chain: The chain breaker tool can push out a damaged link and reconnect the chain. Ensure you understand the process before attempting this repair.
- Tightening Screws: Use screwdrivers to secure loose components like derailleurs or shifters.
- Emergency Repairs: A multi-tool can help you address minor issues that might otherwise end your ride prematurely.
Having a reliable multi-tool and knowing how to use it can save your ride when faced with unexpected mechanical problems on the road or trail. Practice these basics to become more self-sufficient during your cycling adventures.
Fixing Flat Tires with a Patch Kit
A patch kit is a cyclist’s solution for repairing flat tires, ensuring you can swiftly get back on the road or trail. Here’s a concise guide on using a patch kit for fixing flat tires:
Why a Patch Kit is Crucial: A patch kit allows you to mend punctured inner tubes, extending their life and saving you from frequent replacements.
Selecting the Right Patch Kit: Choose a patch kit that matches your tire’s tube size and includes essential tools like sandpaper and tire levers.
Basic Steps for Using a Patch Kit:
- Locate the Puncture: Identify the hole in the tube by inflating it slightly and listening for hissing or feeling for escaping air. Submerge the tube in water to reveal bubbles if the hole is difficult to find.
- Prepare the Area: Scuff the area around the hole with sandpaper from the patch kit to improve adhesion.
- Apply the Patch: Spread a thin layer of glue from the kit onto the sanded area and allow it to dry for a minute or two. Then, firmly press the patch onto the hole, ensuring there are no air bubbles underneath.
- Smooth the Patch: Rub the patch to ensure a secure bond with the tube.
- Reassemble the Tube: Once the patch is firmly in place, reinstall the tube into the tire, making sure it’s seated correctly.
- Inflate the Tire: Pump up the tire to the recommended pressure and check for any additional leaks.
With a patch kit and these basic steps in your toolkit, you can swiftly and effectively repair flat tires, allowing you to continue your ride without interruption. Mastering this skill is a valuable asset for any cyclist.
Chain Maintenance with a Chain Breaker
Chain maintenance is an essential aspect of bike care, and a chain breaker is a valuable tool in this regard. Here’s a concise guide on using a chain breaker to maintain your bicycle chain:
Why Chain Maintenance Matters: Regular chain maintenance prolongs your chain’s life, enhances gear shifting, and prevents costly repairs.
Selecting the Right Chain Breaker: Ensure your chain breaker is compatible with your bike’s chain type, whether it’s a single-speed or multi-speed chain.
Basic Steps for Chain Maintenance:
- Chain Removal: Place your bike in a secure position and shift to the smallest chainring at the front and the smallest cog at the rear. This reduces chain tension, making it easier to remove.
- Locate the Pin: Identify the chain pin you want to remove. It’s usually found near the damaged link or in the section you want to shorten.
- Position the Chain Breaker: Align the chain breaker’s pin with the chain pin you want to remove.
- Apply Pressure: Begin turning the chain breaker’s handle clockwise. The pin will push against the chain pin, gradually pushing it out.
- Remove the Pin: Once the chain pin is fully pushed out, you can remove the damaged chain link or shorten the chain as needed.
- Reconnect the Chain: To reconnect the chain, thread it through the derailleur and around the chainrings. Align the ends of the chain, ensuring they overlap.
- Insert a New Pin: If you removed a link, insert a new chain pin or a quick link and secure it using the chain breaker or a chain tool compatible with the quick link.
- Check for Proper Installation: Carefully pedal your bike through the gears to ensure the chain shifts smoothly and without issues.
A chain breaker is an invaluable tool for maintaining your bike’s chain and ensuring smooth, reliable rides. Regular chain maintenance helps prevent costly repairs and extends the lifespan of your drivetrain.
Monitoring Tire Pressure
Monitoring tire pressure is a crucial aspect of bike maintenance that ensures a smooth and safe ride. Here’s an overview of the process:
Why Monitoring Tire Pressure Matters: Proper tire pressure affects your bike’s performance, comfort, and safety. Underinflated tires can lead to sluggish riding, increased rolling resistance, and a higher risk of flats. Overinflated tires can result in a harsh, uncomfortable ride with less traction.
Tools for Monitoring Tire Pressure:
- Tire Pressure Gauge: A dedicated gauge designed for bike tires provides the most accurate readings.
Basic Steps for Monitoring Tire Pressure:
- Check Recommended Pressure: Refer to the manufacturer’s specifications, usually found on the tire sidewall or in your bike’s manual, for the recommended tire pressure. It’s typically given as a range in PSI (pounds per square inch).
- Inspect the Valve: Ensure the valve stem is in good condition and not damaged. Unscrew the valve cap and press the valve core briefly to release any trapped air.
- Use a Pressure Gauge: Attach the pressure gauge to the valve by pressing it squarely onto the valve stem. The gauge will display the current pressure reading.
- Compare to Recommended Pressure: Check the reading on the gauge against the recommended pressure range. If the pressure is too low, inflate the tire; if it’s too high, release some air until it reaches the desired level.
- Reattach the Valve Cap: Once the tire is properly inflated, screw the valve cap back on securely to prevent dust and debris from entering the valve.
- Repeat for All Tires: It’s essential to monitor and adjust the pressure for both front and rear tires, as they may have different specifications.
- Regular Check: Make it a habit to check your tire pressure before each ride or at least once a week, as tires naturally lose air over time.
Properly inflated tires provide optimal performance, and better handling, and reduce the risk of flats. By following these steps and using a reliable tire pressure gauge, you can ensure that your bike’s tires are always at the right pressure for a safer and more enjoyable ride.
Advanced Bike Tools
Pedal Wrench
A pedal wrench is a specialized bicycle tool designed for the installation and removal of pedals on a bike. It features a slim and elongated profile, allowing it to access the confined spaces around the pedal axles. Here’s an overview of the pedal wrench:
Design: Pedal wrenches are typically thin and long, with a flattened head on one end. The flattened head is designed to fit precisely onto the flats of a pedal spindle, providing a secure grip for turning.
Material: They are commonly made from high-strength steel to withstand the torque required for pedal installation and removal. Some pedal wrenches feature a rubberized or textured handle for improved grip and comfort during use.
Compatibility: Pedal wrenches are designed to accommodate different types of pedals, including those with 15mm flats (common on most pedals) and 9/16-inch threads. Some models may have additional openings or features to fit pedals with various configurations.
Use: The primary function of a pedal wrench is to apply the necessary force to loosen or tighten pedal threads. It allows cyclists and bike mechanics to efficiently attach or remove pedals, ensuring they are secure and correctly positioned.
Importance: Properly installed pedals are crucial for efficient power transfer and rider safety. Using a pedal wrench ensures that pedals are securely fastened to the crank arms, reducing the risk of accidents due to pedal detachment.
Alternatives: While pedal wrenches are the preferred tool for working on pedals, some pedals have a 6mm or 8mm hex socket on the inside of the spindle. In such cases, a hex wrench can be used as an alternative tool for pedal installation and removal.
Maintenance: Pedal wrenches require minimal maintenance. Keeping the tool clean and free from dirt or debris ensures smooth operation. Lubricating the hinge or pivot point may also help maintain its effectiveness.
Whether you’re a casual cyclist or a dedicated bike enthusiast, a pedal wrench is an essential tool to have in your bike maintenance kit. It simplifies the process of pedal installation and removal, making it easier to keep your bicycle in optimal condition.
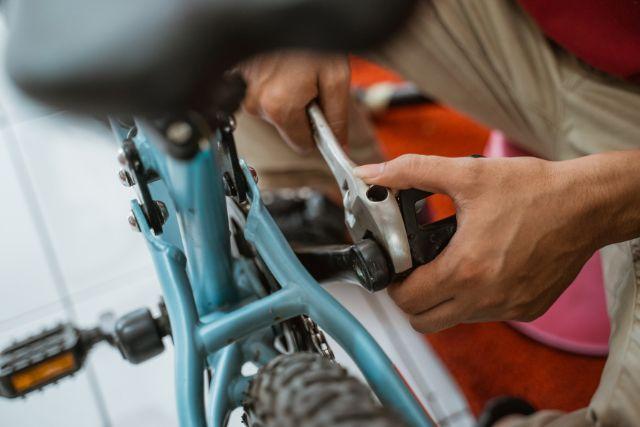
Bottom Bracket Tool
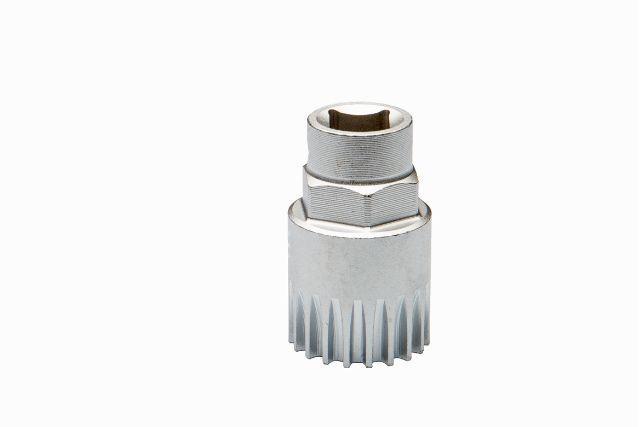
A bottom bracket tool is a specialized bicycle maintenance tool designed for installing, removing, and servicing bottom bracket assemblies. It comes in various types to match different bottom bracket designs. These tools are constructed from durable materials like steel or aluminum to withstand the forces involved in working with bottom brackets.
Their primary function is to engage with the notches or splines on the bottom bracket cups, allowing users to apply torque for removal or installation. Proper bottom bracket maintenance is crucial for efficient pedaling and reducing drivetrain friction. These tools are low-maintenance, requiring occasional cleaning and lubrication to ensure smooth operation. Having the right bottom bracket tool is essential for bike maintenance, regardless of your level of expertise.
Chain Whip
A chain whip is a vital tool for any cyclist or bike mechanic. It plays a key role in various bike maintenance tasks, particularly when it comes to working with cassettes and freewheels. This tool consists of a handle and a long, flexible chain with specially designed teeth that engage with the cassette or freewheel. Its primary purpose is to securely hold the cassette or freewheel in place while you use another tool, like a cassette lockring tool, to loosen or tighten it.
A chain whip is essential for tasks such as cassette removal and installation, which are common in routine bike maintenance and upgrades. By preventing the cassette or freewheel from turning while you apply force to the lockring, the chain whip ensures that you can safely and effectively work on your bike’s drivetrain components.
This tool is available in various designs, with some featuring ergonomic handles for comfort and ease of use. A high-quality chain whip is typically made from durable materials like steel to withstand the forces involved in bicycle maintenance. Whether you’re a seasoned cyclist or a beginner, having a chain whip in your bike tool kit is a smart investment for maintaining and upgrading your bike’s drivetrain components.
Torque Wrench
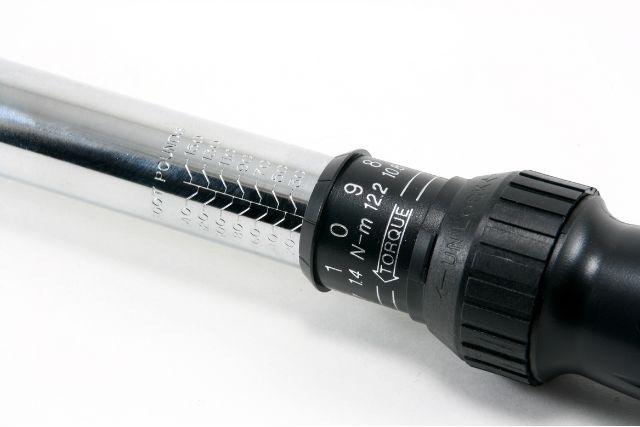
A torque wrench is a precision tool that plays a crucial role in ensuring that various components on your bike are tightened to the manufacturer’s specified torque settings. This tool allows you to apply a specific amount of force or torque when tightening nuts and bolts, helping prevent over-tightening or under-tightening, which can lead to damage or component failure.
Torque wrenches come in different types, such as beam, click, and digital torque wrenches, each with its unique features and advantages. Beam torque wrenches are the simplest and most affordable, featuring a beam that deflects when torque is applied. Click torque wrenches emit a “click” sound or provide tactile feedback when the preset torque is reached, alerting you to stop applying force. Digital torque wrenches offer precision and often have a digital display to show the applied torque value.
These tools are indispensable for tasks like installing handlebars, seat posts, pedals, and other components that require precise torque specifications. Over-tightening components like carbon handlebars or seat posts, for instance, can lead to structural damage and safety risks. Conversely, under-tightening critical components can result in loosening during rides, compromising your safety.
Using a torque wrench helps ensure that your bike is assembled correctly, reducing the risk of damage and enhancing your riding experience. It’s essential to consult your bike’s manual or component manufacturer’s guidelines for recommended torque settings and use a torque wrench to achieve the desired levels of tightness accurately. Whether you’re a casual rider or a dedicated cyclist, a torque wrench is a valuable addition to your bike tool collection for maintaining and servicing your bicycle.
Spoke Wrench
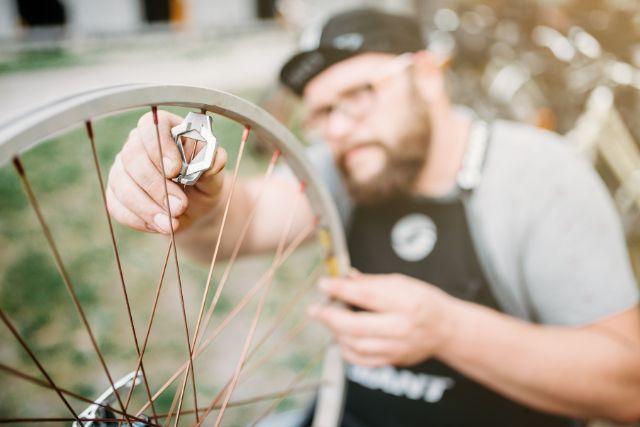
A spoke wrench is a specialized tool used for adjusting the tension of the spokes in a bicycle wheel. Spokes are the thin, metal rods that connect the hub of the wheel to the rim, and they play a crucial role in maintaining the wheel’s integrity and strength.
The spoke wrench typically has a small, wrench-like design with a narrow slot or notch that fits over the spoke nipple. Spoke nipples are the small, threaded components at the rim end of each spoke. By turning the spoke wrench, you can tighten or loosen the spokes to adjust their tension. Properly tensioned spokes are essential for keeping the wheel true (straight) and ensuring it can support your weight and handle the forces of riding.
Here are some key aspects of using a spoke wrench:
- Truing Wheels: One of the primary uses of a spoke wrench is to tie a bicycle wheel. Truing involves adjusting the tension of specific spokes to eliminate any wobbles or hops in the wheel’s rotation. A true wheel is crucial for smooth and stable riding.
- Maintaining Wheel Strength: Over time, spokes may become loose or unevenly tensioned due to regular use or impacts. A spoke wrench allows you to bring all the spokes to the appropriate tension, preventing wheel deformities and ensuring durability.
- Fixing Wheel Wobbles: If you notice your wheel wobbling or rubbing against the brake pads, it’s a sign that your wheel needs truing. A spoke wrench helps you identify and address these issues.
- Replacing Broken Spokes: When a spoke breaks, you can use a spoke wrench to replace it and restore the wheel’s integrity.
Spoke wrenches come in various sizes to accommodate different spoke nipple sizes, so it’s essential to choose the right size for your specific wheel. Learning how to use a spoke wrench effectively is a valuable skill for any cyclist, as it allows you to maintain your wheels and keep them in optimal condition. Properly tensioned spokes contribute to smoother rides, longer-lasting wheels, and enhanced overall cycling performance.
Cable Cutter
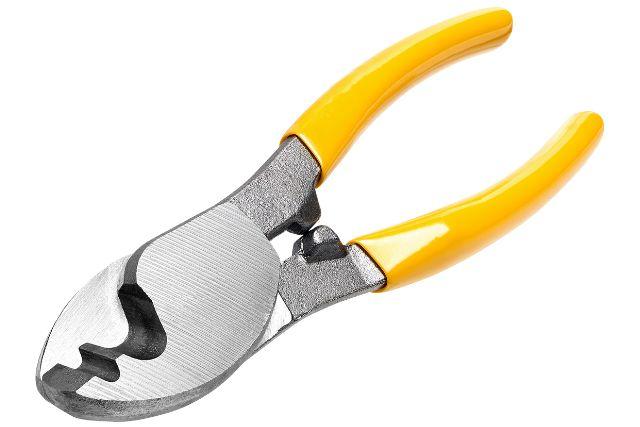
A cable cutter is an essential tool for cyclists, particularly those who perform their bike maintenance and repairs. This tool is designed to cut bicycle cables and housing with precision, making it an indispensable part of your bike toolkit. Here’s a closer look at the cable cutter and its role in bike maintenance:
Cable Cutter Overview:
A cable cutter, as the name suggests, is a tool specifically designed to cut the cables and housing used in bicycle systems. Cables are commonly found in various parts of a bike, including the brakes and derailleurs, while housing is the protective outer layer that surrounds these cables. These components play a crucial role in controlling your bike’s braking and shifting mechanisms.
Importance of Cable Cutters:
- Clean and Precise Cuts: Cable cutters are engineered to make clean and precise cuts, ensuring that your cables and housing are cut to the correct length without fraying or damaging the inner wires. This precision is vital for maintaining the optimal functioning of your bike’s braking and shifting systems.
- Preventing Cable Damage: Regular scissors or pliers can crush and deform the cable ends, leading to poor performance and premature wear. Cable cutters prevent such damage, preserving the integrity of your cables.
- Smooth Shifting and Braking: Well-maintained cables and housing contribute to smoother and more reliable shifting and braking, which is essential for safety and overall ride quality.
- Efficient Repairs: Whether you’re replacing a cable, installing new components, or adjusting your bike’s setup, cable cutters make the process efficient and hassle-free.
- Reducing Maintenance Costs: With a cable cutter, you can handle cable replacements and adjustments yourself, reducing the need for expensive trips to the bike shop.
Using Cable Cutters:
Using cable cutters is relatively straightforward:
- Measure and Mark: Before cutting, measure and mark the cable or housing to the desired length.
- Position the Cutter: Place the cable cutter’s blades over the marked area, ensuring that the cutting edge aligns with your mark.
- Apply Pressure: Squeeze the cable cutter’s handles together to cut the cable or housing. The sharp blades will make a clean cut.
- Inspect the Cut: After cutting, inspect the cable or housing end to ensure there are no frayed or uneven edges.
Cable cutters are available in various sizes and designs, so it’s essential to choose one that suits your specific needs and preferences. Investing in a quality cable cutter will make bike maintenance tasks more manageable and help keep your bicycle in top-notch condition, ensuring a safer and more enjoyable riding experience.
Advanced Bike Repairs and Maintenance
Replacing Pedals with a Pedal Wrench
Replacing pedals with a pedal wrench involves several steps:
- Prepare the Bike: Ensure your bike is stable by placing it on a bike stand or securing it upside down. Make sure the area around the pedals is clear and accessible.
- Determine Pedal Direction: Pedals are typically marked with “L” for the left pedal (which screws in counterclockwise) and “R” for the right pedal (which screws in clockwise). Identify the pedal you need to remove.
- Position the Wrench: Place the pedal wrench on the flats of the pedal axle, ensuring it’s aligned with the direction of pedal removal.
- Apply Force: To remove the pedal, push down on the pedal wrench handle with steady, controlled force. The resistance may be strong, so use caution to prevent sudden slips or injury.
- Unscrew the Pedal: As you apply force, the pedal will gradually unscrew from the crank arm. Continue turning until it’s completely removed.
- Install New Pedals: To install new pedals, apply a small amount of grease to the pedal threads to facilitate smooth installation. Use the pedal wrench to tighten the new pedals securely, ensuring they are properly aligned.
- Check Tightness: Once installed, double-check the tightness of both pedals to ensure they are secure.
A pedal wrench is a valuable addition to any cyclist’s toolkit, especially for those who frequently swap or maintain pedals. Proper use of this tool ensures that pedal replacements are performed efficiently and without damaging critical components, contributing to a safer and more enjoyable cycling experience.
Servicing Bottom Brackets
Servicing bottom brackets is a critical aspect of bicycle maintenance, and the bottom bracket tool is indispensable for this task. It comes in various styles to accommodate different bottom bracket designs. The tool fits into the notches or sockets on the bottom bracket cups, allowing you to loosen or tighten them effectively.
When removing the bottom bracket, use the tool to turn the cups counterclockwise. For installation, turn the cups clockwise to secure the bottom bracket in place. Proper maintenance of the bottom bracket ensures smooth pedaling and minimizes creaking or grinding noises. It’s a skill best learned with the right tool, providing cyclists with the ability to extend the life of their bike’s drivetrain components.
Using a Chain Whip for Cassette Removal
To effectively use a chain whip for cassette removal, follow these steps:
- Secure Your Bike: Begin by securely mounting your bike in a bike stand or flipping it over to rest on the handlebars and saddle.
- Remove the Rear Wheel: If your bike has rim brakes, release the brake cable to remove the rear wheel. For disc brakes, simply slide the wheel out of the dropouts.
- Position the Chain Whip: Attach the chain of the chain whip to one of the larger cogs on the cassette. Ensure that it’s securely engaged with the teeth.
- Engage the Cassette Lockring Tool: Use a cassette lockring tool and a wrench to engage the lockring on the outside of the smallest cog in the cassette. This tool will allow you to turn the lockring counterclockwise to loosen it.
- Hold the Cassette in Place: While turning the lockring tool counterclockwise, use the chain whip to hold the cassette steady. The chain whip prevents the cassette from rotating, allowing you to loosen the lockring effectively.
- Remove the Lockring: Continue turning the Lockring counterclockwise until it’s fully loosened. You can then unthread it by hand.
- Slide Off the Cassette: With the lockring removed, carefully slide the entire cassette off the freehub body. Be mindful of any spacers between the cogs, as they need to be reinstalled in the correct order when reassembling.
- Clean or Replace: You can now clean the cassette and individual cogs, or replace them if necessary. Ensure that everything is in good condition before reassembly.
- Reassembly: To reinstall the cassette, slide it back onto the freehub body in the correct order, ensuring the spacers are correctly positioned. Then, thread the lockring back onto the freehub and tighten it using the lockring tool and wrench. Make sure it’s securely in place.
- Test and Adjust: After reassembly, check that the cassette is functioning correctly. Shift through all gears to ensure smooth and precise shifting.
Using a chain whip correctly is crucial for maintaining and upgrading your bike’s drivetrain components. It allows you to perform essential maintenance tasks and ensures your bike’s gears work flawlessly while cycling.
Importance of a Torque Wrench
A torque wrench is a crucial tool for bike maintenance and assembly tasks. Here’s why it’s important:
- Precision: Torque wrenches provide precise control over the amount of force applied when tightening bolts and nuts. This precision is essential for preventing over-tightening, which can damage components, or under-tightening, which can lead to loose parts.
- Component Safety: Many bike components, such as handlebars, stems, and seat posts, have specific torque specifications provided by manufacturers. Using a torque wrench ensures that you tighten these components to the manufacturer’s recommended settings, reducing the risk of component failure or damage.
- Avoiding Cracks and Failures: Over-tightening bolts, especially on lightweight carbon fiber components, can lead to cracks and structural failures. A torque wrench helps prevent excessive force, preserving the integrity of your bike’s parts.
- Consistency: When working on your bike, consistency is key. A torque wrench allows you to apply the same amount of force to each bolt, ensuring uniform tension across all components. This consistency is vital for the bike’s overall performance and safety.
- Proper Wheel Installation: For wheelsets, a torque wrench ensures that you evenly tighten the bolts or skewers, helping maintain wheel alignment, reduce spoke stress, and prevent wheel wobble.
- Pedal Installation: Installing pedals with the correct torque is essential for your safety while riding. A torque wrench ensures that your pedals are securely attached to the crankarms, preventing accidents due to loose pedals.
- Crankset and Bottom Bracket: Properly torqued crankset and bottom bracket components are crucial for efficient power transfer and preventing creaks and squeaks. A torque wrench guarantees you achieve the right level of tightness without damaging these parts.
- Preventing Overtightening: Over-tightening bolts can cause threads to strip, making it challenging to remove or replace components in the future. A torque wrench helps prevent this issue.
- Maintenance Confidence: Whether you’re a beginner or an experienced cyclist, a torque wrench gives you confidence in your maintenance and assembly tasks. You can be sure that your bike is safe and properly tuned for optimal performance.
- Long-Term Cost Savings: By preventing over-tightening and damage to components, a torque wrench can save you money in the long run. You’ll avoid costly repairs or part replacements resulting from improper torque settings.
In summary, a torque wrench is an essential tool for maintaining your bike’s safety, performance, and longevity. It ensures proper bolt tension, prevents damage to components, and gives you peace of mind while cycling. Whether you’re a casual rider or a seasoned cyclist, investing in a quality torque wrench is a smart choice for bike maintenance.
Truing Bicycle Wheels with a Spoke Wrench
Truing bicycle wheels is a crucial maintenance task that ensures your wheels spin smoothly and remain structurally sound. Here’s how to use a spoke wrench for this purpose:
- Identify the Problem: Before you begin, determine which part of the wheel needs adjustment. Spin the wheel and look for any wobbles or deviations in its alignment. These are usually caused by loose or overly tight spokes.
- Gather Your Tools: You’ll need a spoke wrench that fits the nipples on your wheel spokes. Different wheels may require different spoke wrench sizes, so ensure you have the correct one.
- Secure the Wheel: To work on your wheel, you can either mount it on a truing stand or leave it on your bike. If using a truing stand, follow the stand’s instructions to secure the wheel. If working on the bike, place it in a bike stand or flip it upside down so that the wheel spins freely.
- Locate the Affected Area: Spin the wheel slowly and use the brake pads or a reference point (such as a zip tie on the frame) to identify the section of the wheel with wobbles or deviations. This is the area you’ll need to adjust.
- Adjust the Spokes: To correct wobbles, you’ll need to tighten or loosen specific spokes. Here’s a basic guide:
- For wobbles toward one side of the wheel, tighten the spokes on the opposite side of the wobble. This pulls the rim toward the tighter spokes, reducing the wobble.
- For wobbles to the left, tighten the right-side spokes.
- For wobbles to the right, tighten the left-side spokes.
- Use the Spoke Wrench: Insert the spoke wrench onto the nipple of the spoke you need to adjust. Turn the wrench in the appropriate direction:
- To tighten a spoke and pull the rim toward the spoke, turn the wrench clockwise.
- To loosen a spoke and allow the rim to move away from the spoke, turn the wrench counterclockwise.
- Make Small Adjustments: Turn the spoke wrench in a quarter or half-turn increments. Check the wheel’s alignment after each adjustment by spinning it. Be patient and avoid making overly tight adjustments, as this can cause further issues.
- Repeat as Needed: Continue making adjustments and checking the wheel’s trueness until the wobbles or deviations are minimized, and the wheel runs smoothly.
- Tension Balance: While truing, maintain an even tension in the wheel by occasionally plucking the spokes like guitar strings. They should produce similar tones, indicating balanced tension.
- Final Check: Once the wheel is nearly true, fine-tune it by making small adjustments until it runs perfectly straight.
Remember that wheel training requires practice and patience. If you’re unsure or uncomfortable with the process, consider seeking help from a professional bike mechanic. Properly trued wheels contribute to a smoother, more efficient ride and extend the lifespan of your wheelset.
Cable Replacement and Adjustment
Replacing and adjusting cables on your bicycle is a fundamental skill that helps maintain precise shifting and braking performance. Here’s how to do it:
Tools and Materials Needed:
- New cables and cable housing (if necessary)
- Cable cutters
- Allen wrenches or screwdrivers (depending on cable type)
- Cable end caps
- Needle-nose pliers
- Cable tension adjustment barrel (found on derailleurs)
- Lubricant (cable-specific)

Step-by-Step Guide:
- Prepare Your Bike: Place your bike in a stable position, either in a bike stand or upside down so that you can access the cables and housing easily.
- Release Cable Tension: If you’re replacing a cable, first shift your gears to the smallest chainring and rear cog. For brakes, release the brake lever’s cable tension.
- Remove the Old Cable: Using cable cutters carefully cut the old cable near the cable clamp on the derailleur or brake caliper. Remove any cable end caps and slide the old cable out of the housing.
- Inspect Housing: Check the condition of the cable housing. If it’s worn, damaged, or shows signs of corrosion, consider replacing it. Cut the new housing to the required length, ensuring it matches the old housing’s routing.
- Thread New Cable: Thread the new cable through the appropriate cable housing, following the existing routing. Ensure the housing sits securely in its cable stops or guides.
- Attach Cable: For brakes, slide the cable through the brake lever and secure it in place. For shifting, follow the appropriate procedure for your derailleur or shifter type. Make sure the cable is properly seated in the cable anchor or pinch bolt.
- Set Cable Tension: Begin with a basic adjustment. For brakes, pull the cable tight and secure it, then release the brake to check for proper tension. For shifting, shift to the smallest chainring and rear cog and pull the cable taut before tightening it.
- Fine-Tune Adjustments: Use the cable tension adjustment barrel on the derailleur (for shifting) or brake caliper (for brakes) to fine-tune the cable tension. The goal is to achieve smooth shifting or braking with minimal slack.
- Check Shifting and Braking: Test your bike’s shifting and braking performance. Shift through all gears and check for precise and clean shifts. For brakes, ensure even and effective stopping power.
- Trim Excess Cable: Once you’re satisfied with the cable tension and performance, cut any excess cable, leaving a small length to accommodate future adjustments.
- Cable End Caps: Install cable end caps on the cut cable ends to prevent fraying.
- Lubrication: Apply a bicycle-specific cable lubricant to the cable and inside the cable housing. This ensures smooth cable movement and prevents corrosion.
- Final Checks: Perform a final check of your bike’s shifting and braking to ensure everything is functioning correctly.
Regular cable maintenance is essential for optimal bike performance. When done correctly, cable replacement and adjustment can significantly improve your bike’s shifting and braking, resulting in a safer and more enjoyable ride.
Specialty Bike Tools
Crank Puller
A pedal wrench is a specialized tool designed for the installation and removal of bicycle pedals. It features a long handle and a thin, flat head with a wrench-like opening on both ends. One end typically fits standard pedal axles, while the other may accommodate larger or differently shaped axles.
The pedal wrench is an essential tool for cyclists and bike mechanics, allowing for secure attachment and detachment of pedals, crucial for maintenance, repairs, and customization of a bicycle.
Headset Wrench
A headset wrench is a specialized tool used for adjusting the headset of a bicycle. It typically features thin, flat, and angled ends that fit into the headset’s locknuts and bearing cups.
The headset wrench is designed to provide a secure grip and leverage for tightening or loosening these components, ensuring the proper alignment and smooth steering of the bike. It’s an essential tool for maintaining the headset’s functionality and preventing issues like play or stiffness in the steering system.
Cassette Lockring Tool
A cassette lockring tool is a vital instrument for removing and installing the cassette on a bicycle’s rear wheel. It features a set of splines or notches that correspond to the grooves on the cassette lockring. This tool provides the necessary grip and leverage to securely fasten or unfasten the lockring, allowing for the removal or installation of the cassette.
The cassette lockring tool is indispensable for various maintenance tasks, such as cleaning, lubricating, or replacing the cassette, ensuring smooth gear shifting and optimal drivetrain performance.
Hydraulic Brake Bleeding Kit
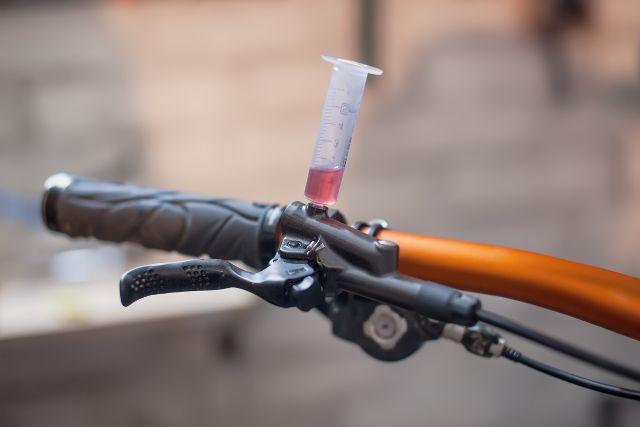
A hydraulic brake bleeding kit is an essential tool for maintaining hydraulic disc brake systems on bicycles. It facilitates the removal of air bubbles and ensures optimal brake performance by purging the brake lines of any trapped air. This kit typically includes a syringe, hose, and adapter fittings specific to the brake system being serviced.
The process involves attaching the syringe to the brake caliper or lever, pushing brake fluid through the system, and expelling any air bubbles. This tool is crucial for maintaining consistent and responsive braking, enhancing rider safety and control while cycling.
Chain Wear Indicator
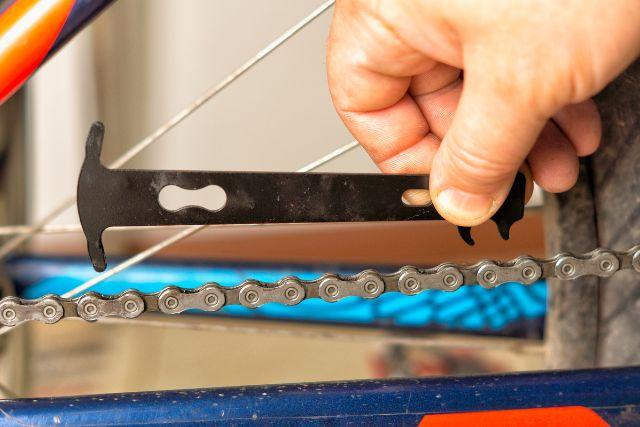
A chain wear indicator, also known as a chain checker or wear gauge, is a simple yet valuable tool used to assess the condition of a bicycle chain. It is designed to measure chain elongation, indicating when it’s time to replace the chain. Over time, chains can wear due to the natural friction between chain links and sprockets. As the chain elongates, it affects shifting precision and accelerates wear on other drivetrain components.
Chain wear indicators typically have two sides, one for measuring 0.75% and another for 1% elongation. When the tool is inserted into the chain, it can determine if the chain has stretched beyond its recommended limit.
Replacing a chain before it becomes excessively worn can help prolong the lifespan of other drivetrain components like cassettes and chainrings. Regular use of a chain wear indicator is essential for maintaining a smooth and efficient cycling experience.
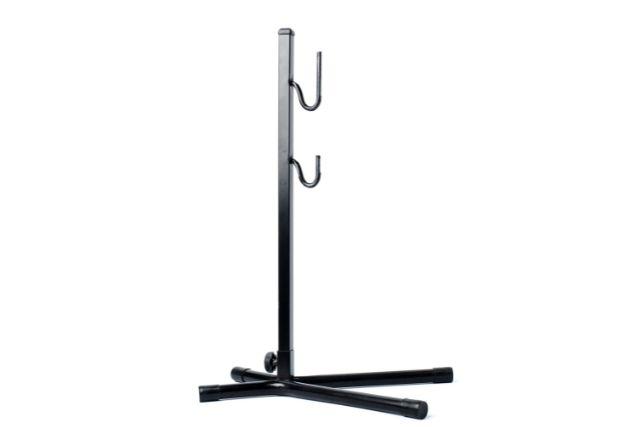
Wheel Truing Stand
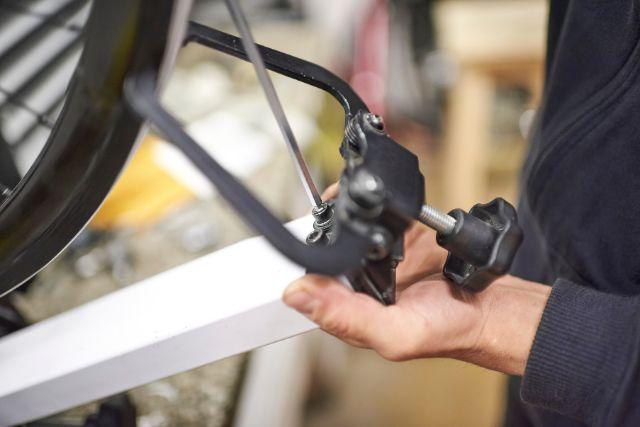
A wheel truing stand is a specialized tool designed to assist in the maintenance and repair of bicycle wheels. It serves as a stable and precise platform for assessing and adjusting the alignment and tension of wheel spokes.
Bicycle wheels are subject to various forces and impacts during riding, which can lead to occasional misalignment and spoke tension issues. A truing stand helps cyclists and mechanics identify and rectify these problems.
Truing stands are equipped with adjustable calipers or arms that can be positioned close to the rim’s surface without touching it. This allows for precise measurements of lateral and radial deviations in the wheel. By spinning the wheel in the stand and observing any wobbles or hops, one can pinpoint areas that need adjustment.
Cyclists use truing stands to ensure their wheels are true, meaning they are straight and have even tension in all spokes. Properly trued wheels are essential for a smoother ride, improved brake performance, and reduced wear on other components.
Wheel truing is considered an advanced maintenance task and may require some practice to master, but a truing stand is an indispensable tool for achieving professional-grade wheel quality.
Specialized Bike Repairs and Maintenance
Removing Cranks with a Crank Puller
To use a crank puller, you’ll typically follow these steps:
- Remove the bike’s pedals if they are still attached to the crank arms.
- Insert the threaded center bolt of the crank puller into the threaded hole in the crank arm.
- Turn the handle clockwise to tighten the center bolt inside the crank arm. As you do this, the crank arm will start to separate from the bottom bracket spindle.
- Continue turning the handle until the crank arm is completely detached from the spindle. Be sure to support the crank arm to prevent it from falling.
- Repeat the process for the other crank arm if necessary.
Crank pullers come in various designs to fit different types of crank arms and bottom brackets, so it’s essential to use the right tool for your specific bike. Using a crank puller ensures that you can remove and replace crank arms safely and efficiently, making it a valuable addition to any cyclist’s toolkit.
Adjusting Headsets with a Headset Wrench
To adjust the headset using a headset wrench, follow these steps:
- Locate the headset locknut and adjusting cone on the top of the bike’s fork. These components typically sit above the headset bearings.
- Determine which size of the headset wrench matches the locknut and adjusting cone.
- Place the appropriate side of the wrench on the locknut and the other side on the adjusting cone.
- Hold the fork or handlebars in place with one hand to prevent any movement.
- Use the headset wrench to turn the locknut clockwise while turning the adjusting cone counterclockwise. This will loosen the locknut and allow you to adjust the tightness of the headset.
- Gradually adjust the headset to your desired tightness. You should aim for a balance between smooth rotation and secure fit, ensuring there is no play in the headset.
- Once the desired tightness is achieved, hold the adjusting cone in place with the wrench while tightening the locknut against it in a clockwise direction to secure the adjustment.
- Check the headset by gently rocking the bike back and forth. There should be no knocking or play in the headset. If needed, make further adjustments.
Using a headset wrench allows you to maintain proper headset tension, ensuring smooth steering and stability while riding. It’s an essential tool for bike mechanics and enthusiasts who want to keep their bicycles in excellent working condition.

Servicing Cassette Lockrings
To use a cassette lockring tool for servicing cassette lockrings, follow these steps:
- Secure the bike: Before you begin, make sure your bike is stable and cannot roll or tip over. You may want to place it in a bike stand or use a wheel truing stand to elevate the rear wheel.
- Remove the rear wheel: If you’re replacing or servicing the cassette, start by removing the rear wheel from the bike. This typically involves releasing the quick-release or thru-axle skewer and sliding the wheel out of the dropouts.
- Locate the cassette lockring: The cassette lockring is situated at the center of the cassette cluster, facing the wheel hub. It’s the ring with a series of notches or splines around its inner edge.
- Insert the lockring tool: Insert the cassette lockring tool into the notches of the lockring. Ensure that it engages securely with the splines, preventing slipping during the removal process.
- Apply force counterclockwise: Using a large adjustable wrench or a specialized lockring removal tool with a handle, apply counterclockwise force to the cassette lockring tool. This will loosen the lockring from the freehub body threads.
- Remove the lockring: Continue turning the tool counterclockwise until the cassette lockring is completely unscrewed from the freehub body. You can then slide the cassette off the free.
- Clean or replace components: With the lockring removed, you can now clean the cassette, freehub body, and other related components. If you’re replacing the cassette or making upgrades, this is the time to do so.
- Reinstall or upgrade: When you’re ready to reassemble, slide the new cassette onto the freehub body, ensuring proper alignment with the splines. Thread the cassette lockring onto the freehub body by hand to prevent cross-threading, and then use the lockring tool to tighten it securely clockwise.
- Reinstall the rear wheel: Place the rear wheel back into the dropouts, ensuring it’s properly seated and secured. Tighten the quick-release or thru-axle skewer as needed.
Using a cassette lockring tool allows you to maintain, replace, or upgrade the cassette on your bike, ensuring smooth and efficient shifting. It’s a valuable tool for any cyclist looking to perform their own maintenance or modifications.
Bleeding Hydraulic Brakes
Bleeding hydraulic brakes is a crucial maintenance task for ensuring the optimal performance and safety of your bike’s braking system. Hydraulic brakes use hydraulic fluid to transmit force from the brake lever to the brake caliper, providing powerful and reliable stopping power.
Over time, air bubbles can enter the hydraulic system, leading to a spongy or ineffective brake feel. Bleeding the brakes removes these air bubbles and refreshes the hydraulic fluid, restoring brake performance.
Here’s a general overview of how to bleed hydraulic brakes on a bicycle:
- Gather the necessary tools and supplies: To bleed hydraulic brakes, you’ll need a few tools and supplies, including a bleed kit specific to your brake system, a bottle of compatible brake fluid (usually mineral oil or DOT brake fluid), a 7mm or 8mm open-end wrench (for some bleed kits), and a plastic syringe or funnel with tubing.
- Prepare your workspace: Find a clean, well-ventilated area to work on your bike. Lay down some absorbent material or use a dedicated work mat to catch any brake fluid that may drip during the process. Ensure you have enough space to move around comfortably.
- Remove the wheel: To access the brake caliper and lever, you may need to remove the wheel from the bike. This step can vary depending on your bike’s design.
- Locate the bleed ports: Hydraulic brake systems typically have two bleed ports—one on the brake lever or master cylinder and another on the brake caliper. Consult your brake manufacturer’s instructions to identify the specific locations of these ports.
- Attach the bleed kit: Follow the instructions provided with your bleed kit to attach the appropriate adapters to the bleed ports on both the brake lever and caliper. These adapters allow you to connect the syringe or tubing for fluid transfer.
- Prepare the syringe or funnel: Fill the plastic syringe or funnel with fresh brake fluid. Make sure there are no air bubbles in the syringe or tubing.
- Begin the bleeding process: With the bleed kit in place, start at the brake lever. Typically, you’ll perform a “push and pull” or “gravity” bleeding method. This involves pushing fresh brake fluid through the system to purge air bubbles. Follow the specific instructions for your brake system regarding the order and number of times you should cycle the brake lever.
- Bleed the caliper: After addressing the lever, move to the caliper. Attach the syringe or funnel to the caliper bleed port, and follow the manufacturer’s instructions to push brake fluid through the system while ensuring all air bubbles are expelled.
- Check for air bubbles: During the bleeding process, keep an eye on the fluid in the syringe or funnel. Make sure there are no air bubbles entering the system. Continue bleeding until you see a consistent flow of fresh fluid without bubbles.
- Tighten bleed ports: Once the bleeding is complete, remove the bleed kit components and tighten the bleed ports securely.
- Test the brakes: Reinstall the wheel if necessary and test your brakes to ensure they feel firm and responsive. Squeeze the brake lever a few times to confirm proper operation.
- Clean up: Dispose of any used brake fluid and properly dispose of any materials that came into contact with the fluid. Wipe down your bike to remove any spilled brake fluid.
Regularly bleeding your hydraulic brakes helps maintain their performance and ensures your safety while riding. If you’re unsure about the bleeding process or encounter any issues, it’s advisable to seek assistance from a professional bike mechanic or refer to your brake manufacturer’s specific instructions.
Checking Chain Wear
Checking chain wear is a fundamental aspect of bicycle maintenance, as it helps prevent premature wear on other drivetrain components and ensures a smooth and efficient riding experience. The chain is a critical part of your bike’s drivetrain, responsible for transferring power from your pedals to the rear wheel.
Over time, chains naturally wear due to friction and usage, which can lead to poor shifting, decreased pedaling efficiency, and accelerated wear on cassette and chainring teeth.
Here’s how to check the wear of your bicycle chain:
- Chain Checker Tool: To accurately measure chain wear, you’ll need a chain checker tool or a chain wear gauge. These tools are specifically designed to assess chain elongation, which is a common form of wear.
- Locate the Chain: Position your bike in a stable manner, ensuring the chain is accessible for measurement.
- Check for Proper Tension: Before assessing wear, ensure your chain is properly tensioned. Incorrect chain tension can affect the accuracy of your measurements. Follow your bike’s manufacturer guidelines for chain tension.
- Select the Appropriate Tool: If using a chain checker tool, select the side labeled “0.75” or “0.5” (representing 0.75% and 0.5% chain wear) depending on your tool’s design.
- Engage the Tool: Insert the tool’s prong into the chain’s links at the appropriate location. Ensure the tool is properly seated and aligned with the chain.
- Assess Chain Wear: Gently engage the tool into the chain while keeping it parallel to the chainstay. As the tool engages, observe the results. If the tool fully engages without significant movement, your chain is likely within an acceptable level of wear. However, if the tool drops or engages with noticeable play, it indicates chain elongation and wear.
- Measure Multiple Points: For a comprehensive assessment, measure the chain’s wear at multiple points. Move the tool along the chain, checking various sections. Chains can wear unevenly, so inspecting multiple areas provides a more accurate evaluation.
- Replace if Necessary: If your chain exhibits significant wear and elongation, it’s time for a replacement. Riding with a severely worn chain can accelerate wear on the cassette and chainrings, leading to a more costly repair in the long run.
Regularly checking your bike’s chain wear and replacing it when necessary will help extend the lifespan of other drivetrain components and maintain your bike’s overall performance. Keep in mind that proper chain maintenance also includes routine cleaning and lubrication to minimize wear and improve shifting efficiency.
Wheel Truing with a Truing Stand
Steps for Wheel Truing with a Truing Stand:
- Mount the Wheel: Place your bicycle wheel into the truing stand’s upright arms. Ensure that the wheel is securely held but can still rotate freely.
- Check for Lateral Deviation: Begin by checking for lateral deviations (side-to-side wobbles). Spin the wheel slowly and observe the alignment by referring to the lateral calipers or indicators on the truing stand. Identify any areas where the wheel deviates from true.
- Adjust Spoke Tension: To correct lateral deviations, you’ll need to adjust the tension of the spokes. If the wheel is deviating to the right, you’ll need to tighten the spokes on the left side of the deviation. Conversely, if it deviates to the left, tighten the spokes on the right side. Gradually adjust the spokes in small increments.
- Recheck Alignment: After making adjustments, spin the wheel again and recheck the alignment. Continue the process of making small adjustments, spinning the wheel, and rechecking until the lateral deviation is minimized, and the wheel runs true.
- Check for Radial Deviation: Once the lateral deviation is addressed, inspect the wheel for radial deviations (up-and-down hops). Use the radial calipers or indicators on the truing stand to identify any uneven spots in the wheel’s rim.
- Adjust Radial Deviations: To correct radial deviations, adjust the spoke tension accordingly. Loosen spokes in areas where the rim is too high and tighten spokes in areas where it is too low. Make gradual adjustments and recheck the wheel’s radial alignment.
- Final Inspection: After correcting both lateral and radial deviations, perform a final spin of the wheel to ensure it runs perfectly true. Check for any remaining issues and make any additional adjustments as needed.
A truing stand provides a precise and controlled environment for wheel truing, allowing you to achieve optimal results. Regularly truing your bicycle wheels not only enhances their performance but also extends their lifespan, ensuring a smoother and safer riding experience.
Other Handy Bike Accessories
Bike Stand
A bike stand is a valuable accessory for cyclists that provides a stable and secure platform to support and hold your bicycle. Unlike a truing stand, which is specialized for wheel maintenance, a bike stand is a versatile tool used for various tasks, including cleaning, maintenance, and repairs.
It simplifies these tasks by elevating your bike off the ground, allowing easy access to different components. Whether you’re a professional mechanic or a DIY enthusiast, a bike stand is an excellent addition to your cycling toolkit.
Bike Stand Overview: A bike stand typically consists of a sturdy frame with a clamp or support mechanism designed to securely hold your bicycle. It can come in various styles, including:
- Repair Stand: This type of bike stand is designed for performing repairs and maintenance tasks. It often has a telescopic or adjustable height feature to accommodate different bike sizes and positions.
- Portable Stand: Portable bike stands are lightweight and foldable, making them easy to transport. They are suitable for on-the-go repairs and bike cleaning.
- Wall-Mounted Stand: Wall-mounted bike stands are fixed to a wall or vertical surface. They save floor space and can be used for storage or basic maintenance.
Key Features:
- Clamping Mechanism: Bike stands typically have a clamping mechanism that securely holds your bike by the seat post, top tube, or other frame components. Some use quick-release clamps for easy bike attachment and removal.
- Stability: A stable base or legs provide support and prevent the stand from tipping over while you work on your bike.
- Adjustability: Many bike stands offer height and angle adjustability to ensure you can position your bike at a comfortable working height.
Using a Bike Stand: Using a bike stand simplifies various tasks, including:
- Cleaning: Elevating your bike off the ground makes it easier to clean the frame, drivetrain, and wheels.
- Repairs and Maintenance: A bike stand allows you to perform tasks such as adjusting gears, replacing cables, and working on the brakes more comfortably.
- Chain Lubrication: Applying lubricant to the chain is more precise when the bike is stationary on a stand.
- Wheel Truing: While a truing stand is ideal for wheel-specific maintenance, a bike stand can also assist in minor wheel truing tasks.
- Storage: When not in use, a bike stand can serve as a convenient storage solution, keeping your bike organized and out of the way.
Whether you’re a casual rider or a dedicated cyclist, a bike stand enhances your overall biking experience by simplifying maintenance and repairs. It allows you to keep your bicycle in top condition, ensuring safer and more enjoyable rides.
Lubricants and Cleaners
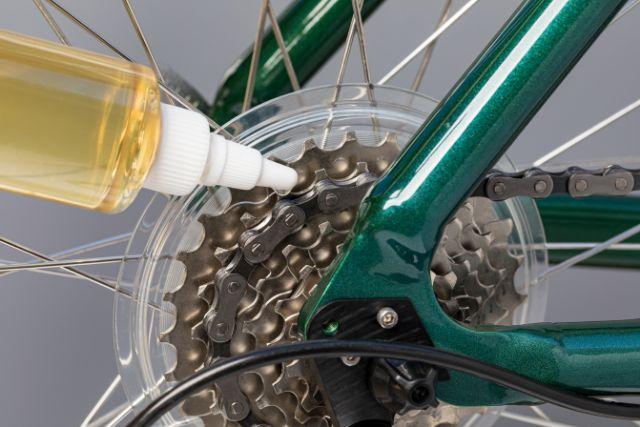
Lubricants and cleaners are vital for maintaining your bicycle’s performance and longevity. These products serve distinct purposes:
Lubricants:
- Chain Lubricants: Keep your chain in top shape, available in various types to suit different riding conditions.
- Cable Lubricants: Ensure smooth braking and shifting by lubricating control cables.
- Greases: Protect crucial components like bearings and pedal threads from wear and corrosion.
- Suspension Fork Lubricants: Maintain suspension forks for optimal performance.
- General-Purpose Lubricants: Versatile options for various bike parts.
Cleaners:
- Degreasers: Remove stubborn grease and oil from drivetrain components.
- Bike Wash Solutions: Clean your entire bike, including the frame, wheels, and more.
- Cleaning Tools: Brushes and devices to reach and clean tricky spots.
- Protective Polishes: Add a protective layer to repel dirt and water from your bike’s frame and components.
To use these products effectively:
- Apply lubricants sparingly to the right parts, like the chain and cables.
- Prior to cleaning, rinse off loose dirt with water.
- Follow manufacturer instructions for specific cleaning products.
- Maintain a regular cleaning and lubrication schedule based on riding frequency and conditions.
By following these guidelines, you’ll ensure your bike performs well and stays in excellent condition for longer.
First Aid Kit
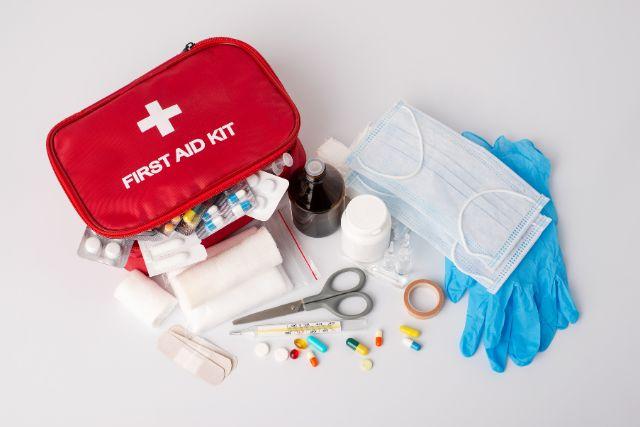
A first aid kit is an essential accessory for any cyclist. It’s crucial for addressing minor injuries and emergencies while on the road or trail. Here’s what a basic first aid kit for cycling typically includes:
Bandages: Various sizes of adhesive bandages for covering cuts, scrapes, and blisters.
Sterile Gauze Pads: Used to clean wounds or as a dressing for larger injuries.
Antiseptic Wipes: To clean and disinfect wounds before bandaging.
Adhesive Tape: Secures bandages or gauze in place.
Tweezers: For removing splinters or debris from wounds.
Scissors: Used for cutting tape, clothing, or gauze.
Disposable Gloves: Provides protection when treating wounds.
Pain Relievers: Over-the-counter pain relievers like ibuprofen.
Antihistamines: Useful for allergic reactions to insect stings or bites.
Cotton Balls or Swabs: For cleaning wounds or applying ointments.
Instant Cold Packs: Helps reduce swelling and soothe minor injuries.
Emergency Contact Information: A card with your emergency contacts and any medical conditions or allergies.
Knowing how to use the items in your first aid kit is crucial. Consider taking a basic first aid course to learn proper techniques. Also, periodically check and replenish your kit to ensure everything remains in good condition and within its expiration dates. A well-prepared first aid kit can make a significant difference in handling unexpected situations during your cycling adventures.
Saddlebag or Bikepacking Gear
Saddlebags or bike packing gear are vital for carrying your essentials and supplies during long rides or bike-packing adventures. These accessories offer storage solutions without hindering your cycling performance. Here’s an overview of these accessories:
Saddlebag: A saddlebag is a compact bag that attaches beneath your bike’s saddle. It’s ideal for storing small tools, a spare tube, patch kits, and other essentials. Saddlebags come in various sizes and styles, allowing you to choose one that suits your storage needs. They’re easy to install and don’t affect your bike’s aerodynamics.
Frame Bags: Frame bags are designed to fit within your bike’s main triangle, utilizing the often-underutilized space. They offer a convenient way to carry larger items like clothing, food, or camping gear. Frame bags come in different sizes to match your frame size and offer a streamlined and balanced way to distribute weight.
Handlebar Bags: Handlebar bags attach to your handlebars and offer quick access to items like snacks, a camera, or a map. They’re perfect for keeping essential items within reach while cycling. Handlebar bags often have map pockets and clear touch-sensitive compartments for smartphones or GPS devices.
Top Tube Bags: These small bags attach to the top tube of your bike, providing additional storage for items like energy gels, a smartphone, or a small camera. They are convenient for accessing essentials without stopping.
Seat Packs: Seat packs are larger packs that attach to your saddle and seat post. They are suitable for carrying bulkier items, clothing, or camping gear. Seat packs come in various sizes to accommodate your storage needs.
When selecting saddlebags or bike packing gear, consider factors like the type of cycling you’ll be doing, the duration of your rides, and the items you need to carry. These accessories enhance your cycling experience by allowing you to comfortably transport everything you need for your journey.
Conclusion
Recap of Essential Bike Tools
In conclusion, having the right bike tools is essential for every cyclist, whether you’re a beginner or a seasoned rider. These tools empower you to perform basic maintenance, handle common repairs, and ensure your bike is always in top condition. Here’s a recap of the essential bike tools you should have:

Basic Bike Tools:
- Tire Levers: Essential for safely removing and installing tires.
- Bike Pump: Keeps your tires properly inflated for a smooth ride.
- Multi-Tool: A versatile tool with various functions for on-the-go adjustments.
- Patch Kit: Allows you to repair punctured inner tubes quickly.
- Chain Breaker: Essential for resizing or repairing bike chains.
- Tire Pressure Gauge: Ensures your tires are inflated to the correct pressure.
- Pedal Wrench: Needed for installing or removing pedals.
- Bottom Bracket Tool: Used for servicing the bottom bracket.
Advanced Bike Tools:
- Chain Whip: Essential for cassette removal and installation.
- Torque Wrench: Ensures precise tightening of bolts to prevent damage.
- Spoke Wrench: Facilitates wheel truing and spoke adjustments.
- Cable Cutter: Ideal for trimming and replacing cables and housing.
- Specialized Bike Tools: Tools like a crank puller, headset wrench, cassette lockring tool, and more for specific bike components.
- Wheel Truing Stand: Provides precision when truing wheels and ensuring they spin true.
- Other Handy Bike Accessories: Consider accessories like a bike stand, lubricants, cleaners, first aid kit, saddlebags, or bike packing gear to enhance your cycling experience.
With these tools at your disposal, you can confidently perform basic maintenance and address common issues that may arise while cycling. Regular bike maintenance not only prolongs the life of your bicycle but also ensures your safety and enhances your riding experience. Invest in quality tools and get familiar with their usage to become a self-sufficient cyclist ready for any adventure on two wheels.
Importance of Bike Maintenance
Bike maintenance is crucial for the performance, longevity, and safety of your bicycle. Properly maintaining your bike offers several key benefits:
1. Enhanced Performance: Regular maintenance ensures that your bike operates at its best. Properly lubricated chains, well-adjusted gears, and correctly inflated tires make your ride smoother and more efficient.

2. Safety: Safety is paramount while cycling. Regular maintenance checks help identify and address potential safety hazards such as worn brake pads, loose components, or damaged tires before they lead to accidents.
3. Cost Savings: Routine maintenance is often more affordable than repairing or replacing major bike components. Catching and addressing issues early can save you from expensive repairs down the road.
4. Longevity: Taking care of your bike can significantly extend its lifespan. Components like chains, cassettes, and gears wear out over time, but proper maintenance can help them last longer.
5. Confidence: Knowing that your bike is in top condition boosts your confidence while riding. You can enjoy your rides without worrying about unexpected breakdowns or malfunctions.
6. Ride Quality: A well-maintained bike provides a more enjoyable riding experience. Smooth gear shifting, responsive brakes, and properly inflated tires contribute to a comfortable and enjoyable ride.
7. Environmental Impact: Maintaining your bike reduces the need for frequent replacements, which in turn reduces waste and the environmental footprint associated with bike production.
8. Knowledge and Self-Sufficiency: Learning how to maintain your bike not only saves money but also empowers you with valuable mechanical skills. You can make basic adjustments and repairs on the go, increasing your self-sufficiency as a cyclist.
By prioritizing bike maintenance, you can keep your bicycle in top shape, ensure your safety on the road or trail, and enjoy a more cost-effective and fulfilling cycling experience.
Encouragement for Riders to Learn and Carry Tools
Encouraging riders to learn basic bike maintenance and carry essential tools offers numerous advantages. Learning these skills grants you independence by allowing you to handle common issues on your own. It also leads to cost savings as you won’t need to visit a bike shop for minor repairs.
Timeliness is another benefit, ensuring you can swiftly address mechanical problems during rides, preventing long delays. Furthermore, self-maintenance enhances safety by preventing accidents and injuries. It’s an opportunity for skill development, deepening your understanding of your bike.

Embracing maintenance also has a positive environmental impact by reducing the need for new parts and minimizing waste. Ultimately, the confidence in your bike’s reliability enhances your overall cycling experience, making it more enjoyable.
So, equip yourself with the right tools, gather knowledge about basic maintenance, and enjoy the peace of mind that comes with self-sufficiency on your cycling adventures.