Having the skill of navigating with a magnetic compass and a map is one of the most important outdoor skill that you could master. In this article we’ll break down the parts of a compass and everything you’ll need to know on how to use one.

Before we all carried a phone with GPS, before Google Maps and even before physical maps, people used to navigate using a compass. Many people underestimate the power of the skill of learning to navigate with a compass but once you’ll wake up in the middle of nowhere with no signal on the phone, then knowing your way home with a compass can definitely save you from a really bad hike or even worse.
A compass work because of it’s magnet which are attracted by the poles of the earth. Below we’ll cover all the parts of a compass, why they are there and how to use them properly.
Why the Skill of Compass Orienteering is so Important
Since the GPS was launched in 1978, people pretty much forgot about the art of navigating with a compass. Of course is very appealing to use a GPS because you just open you phone and without any skill required, you can find precisely and fast your location.
But what you will do if your electronics will fail or there is no signal or the juice in the battery is gone? Many times electronics fail when you need them the most and those who fail less are pretty expensive.
Standard magnetic compasses where always reliable because they don’t need battery or signal and other modern things to work. In general, is a good think to add another type of orienteering skill under your belt, is always a good think to find your way in no matter what situation.
What is a Compass and how it works?
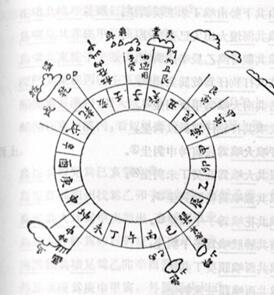
A compass is a tool that helps you find the cardinal directions, used in navigation and orientation and was and it still is one of the basic tools a traveler, hiker or sailor could own.
The most important part of a compass is the magnetized needle which is aligning itself always to the magnetic north direction. Quite often the angles are shown in degrees and that make the north to correspond to 0° and going clockwise then the east would be at 90°, south at 180° and west to 270°.
The compass is using these degrees to show bearings or azimuths. If you have a physicals map and there it’s shown the variation between the magnetic north and the true north, then with this you could find the direction of true north and thus allowing you to follow that to reach your destination.
It is considered one of the Four Great Inventions from ancient China along gunpowder, papermaking and printing.
Different Types of Compasses
First you must know that there are different types of compasses used for different purposes and all these types go into two big category which are the magnetic compasses and the non-magnetic compasses.
| Magnetic Compasses | Non-Magnetic Compasses |
| Base Plate Compass | Gyro compass |
| Thumb compass | Astrocompass |
| Card compass | Solid state compass |
| Prismatic compass | GPS compass |
Learn the Parts of a Compass
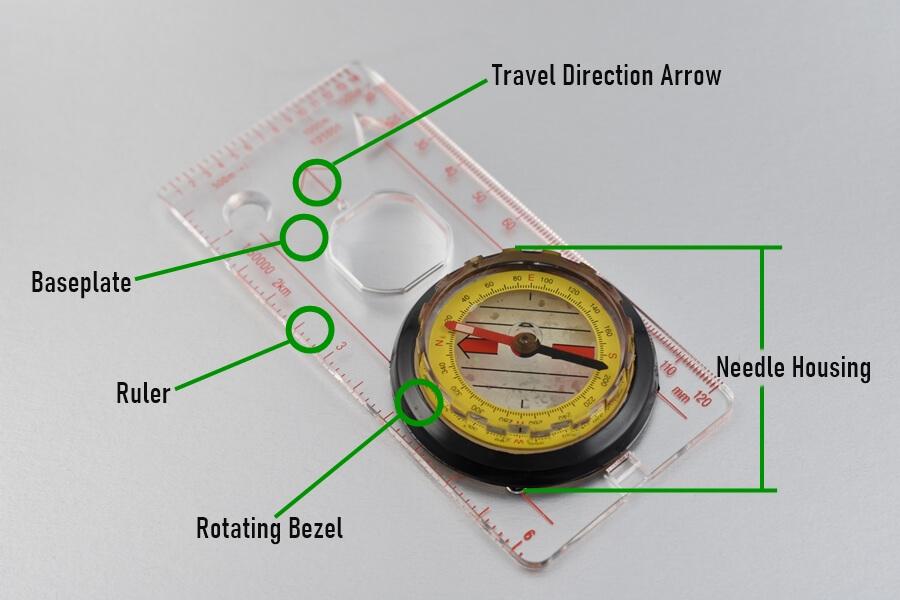
Here are the essential parts of a standard modern plastic compass:
Baseplate: Most of the modern compasses baseplates are transparent so you can see the map underneath it. It must have at least one straight edge for when you take bearings and put them on the map.
Travel Direction Arrow: Shows you the direction on which you need to point the compass when you are following a bearing point.
Ruler: Good for taking the map scale to figure out the walking distance and also for day to day use in case you need to measure something.
Rotating Bezel or Azimuth Ring: Is the rotating ring with degree markings used in aligning the orienting arrow with the north on a map.
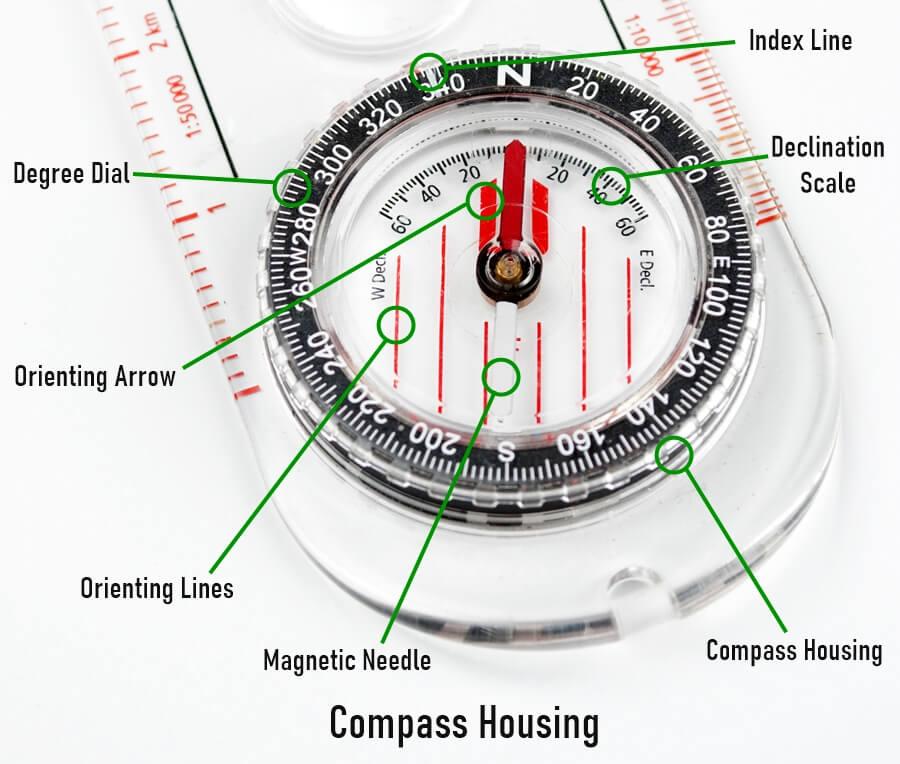
Compass or Needle Housing: Is the circle shaped transparent housing where the needle, rotating bezel and the other parts below.
Magnetic Needle: It always point to the magnetic north of the earth and is painted in red and / or white most of the times.
Orienting Lines: These lines marked at the bottom of the compass which are rotating with the Azimuth Ring or Bezel. You have to align these lines with the lines marked on a map, that way you align the orienting arrow to show north.
Orienting Arrow: This arrow is rotating with the bezel and fits the needle in. This action is also called “red in the shed” allowing you to follow a set bearing.
Degree Dial: The degree dial is a ring that the needle housing. Usually you can turn the compass or turn the dial until it shows North and matches with the needle. On come compasses there are some extra degrees that helps on taking a bearing.
Index Mark: Is above the bezel and is following the other side of the direction of travel line. Through this line you read the bearing.
Declination Scale: Some compass models have these marks. You use these marks to find the difference between True North and Magnetic North. They make sense more when you are navigating closer to the earth’s poles.
Adjust the Declination
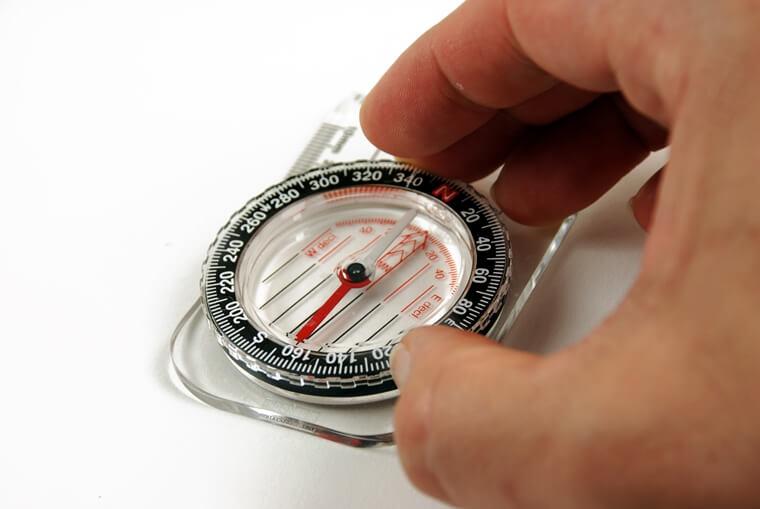
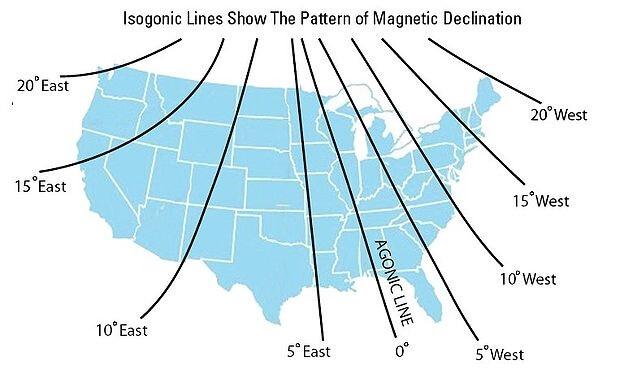
The angle between the True North and and the Magnetic North is known as Declination. It takes some skills to find your declination based on where you are located, which is different in every spot on Earth. Also this declination changes slowly over time due to tectonic plates movement so is better to have with you an updated map for better results. This declination should be written on the map usually. For example, in a map should be written something like 10 degrees west.
In US, the declination varies between negative 6° degrees west in California to around 14°west in parts of Boston. Correctly adjusting for declination is very important because even a single degree wrong can lead you to more than a mile in the wrong direction. To be sure, consult the NOAA website to find the latest declination in the area where you want to go and take a look on the image below to make an idea.
Orient your map and find your location

Before even going on the trip you need to make sure that your eye is trained to corelate the features on the map with landmarks in real life. If you know that you are not so good with orientation then maybe is better to consult with other people who are good at it and train this with places closer to your home before doing the big trip.
If your compass is transparent then place in on your paper map which must be oriented correctly. T he direction of travel arrow must point to North, the top of your map and knowing the declination, you can adjust the bezel to that. After that you slowly rotate your body until the needle aligns within the orienting marks or how other are saying, until the “red is in the shed”. Once that you have this correct position you must pick some landmarks and study the direction where you will travel. Do not forget to do this from time to time to update your position.
Take a Bearing with a Compass
There are two ways where you can use your compass to orient around. First is with a map and second is by sight. Of course it matters if you know your location or not.
When you know your location already and have it on the map then you can you the compass to navigate in any place of that map. First you need to adjust for declination as stated above and then orient your map to true north. After that you need to place the compass baseplate corner right at the point where you want to navigate on the map. Now rotate your compas until your location and the intended destination forms a straight line. Draw that line on the map.
Now it’s time to rotate the azimuth ring or bezel until the grid lines from the map matches the grid lines of the baseplate of your compass. The number on the index line is now your bearing that should take you in the right direction.
From now on, by having that bearing noted down, you can take you compass out anytime you want and check if you are in the right direction. Hold your compass with your hands straight and rotate your body until the north arrow on the needle matches with the needle on the compass.
If you don’t know your location then you need to use a process called triangulation where you do the same process from above but three times to form a triangle. You should be in that triangle.


