Picture this: you’re deep in the heart of the wilderness, surrounded by towering trees, the sounds of nature, and a sky filled with stars. It’s a breathtaking experience, but what if unexpected circumstances leave you needing shelter to survive the night or find refuge from the elements?
That’s where your survival skills come into play. In this guide, we’re diving headfirst into the art of wilderness shelter-building – a fundamental skill for outdoor enthusiasts, adventurers, and anyone seeking self-reliance in the great outdoors.
From crafting makeshift lean-tos to constructing robust A-frame shelters, we’ll explore various techniques and materials to help you stay dry, warm, and protected when venturing off the beaten path. Whether you’re an avid backpacker, a wilderness explorer, or simply curious about honing your survival abilities, building a shelter in the wilderness is a skill that can be both practical and rewarding. So, let’s roll up our sleeves and uncover the secrets to creating a safe haven amidst nature’s beauty.
Survival skills are crucial
Survival skills are crucial, especially when you find yourself in remote or unexpected situations in the wilderness. While modern camping gear and equipment provide comfort, knowing how to build a shelter from natural resources is a valuable skill that can make all the difference.
Whether you’re an experienced outdoors person or a novice, being prepared with the knowledge to construct a shelter can provide peace of mind and enhance your ability to handle unexpected challenges while enjoying the great outdoors. In this article, we’ll guide you through various shelter-building techniques, step by step, ensuring you have the know-how to stay safe and comfortable in the wild.
Importance of shelter in the wilderness
The importance of shelter in the wilderness cannot be overstated. It serves as your primary defense against the unpredictable forces of nature, providing you with protection from harsh weather conditions, extreme temperatures, and potential wildlife encounters. A well-constructed wilderness shelter can mean the difference between a safe, comfortable night under the stars and a potentially dangerous situation.
Shelter not only offers physical protection but also provides a psychological boost. It can help you stay calm, maintain body heat, and conserve energy, which are all essential for survival in the wild. Additionally, having a shelter can increase your chances of being spotted by rescue teams in case you become lost or injured.
Assessing the environment
Understanding the terrain and weather conditions
Before embarking on the task of building a wilderness shelter, it’s crucial to assess your environment thoroughly. Understanding the terrain and current weather conditions is essential for making informed decisions about the type of shelter you should construct.
- Terrain: Take a close look at the landscape around you. Is it a dense forest, an open field, a rocky mountainside, or near a water source like a river or lake? The type of terrain will influence your choice of shelter and its location. For instance, a forested area may provide ample materials for constructing a debris hut, while an open field might require a different approach.
- Weather Conditions: Weather plays a significant role in shelter-building. Is it a clear, sunny day, or are dark clouds gathering on the horizon? Are temperatures dropping rapidly, or is there a chance of rain, snow, or strong winds? Understanding the current and forecasted weather conditions will help you select the most suitable shelter design to keep you warm and dry.
- Safety Concerns: Consider potential safety hazards in the area. Are there any wildlife risks, such as bears or snakes, that might impact your choice of shelter location? Be aware of your surroundings and choose a spot that minimizes these risks.
By thoroughly assessing your environment, you’ll be better prepared to make decisions about the type of shelter you need and where to build it. This knowledge is crucial for ensuring your safety and comfort while facing the challenges of the wilderness.
Identifying suitable shelter locations
Selecting the right wilderness shelter location is crucial for safety and effectiveness. Follow these key tips:
- Elevated Ground: Choose higher ground to prevent flooding and improve drainage.
- Natural Windbreaks: Look for natural barriers like rocks or trees to shield against winds.
- Resource Proximity: Stay close to water sources and materials for convenience.
- Wildlife Safety: Avoid animal activity areas, especially in bear country.
- Visibility: Select a spot where you can signal for help if needed.
- Fire Safety: Build fires away from sleeping areas and clear flammable materials.
- Leave No Trace: Minimize your environmental impact by practicing Leave No Trace principles.

Consider your unique situation and shelter type when finalizing your location. Prioritize safety and practicality in your choice.
Choosing the right shelter design
Considerations for different seasons
Selecting the appropriate shelter design depends on the season and weather conditions you expect to encounter. Here are some considerations:
1. Warm Weather Shelters:
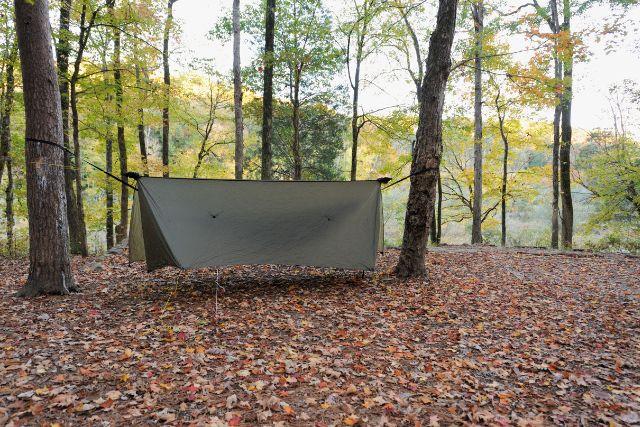
- Tarp Shelter: Ideal for sunny or rainy seasons. It provides shade and basic rain protection.
- Hammock Tent: Perfect for warm, buggy areas, keeping you off the ground and away from insects.
2. Cold Weather Shelters:
- Four-Season Tent: Offers insulation and protection from harsh winter elements like wind and snow.
- Snow Cave or Igloo: Effective for extreme cold, providing insulation and wind resistance.
3. Transitional Seasons:
- Three-Season Tent: Versatile for spring, summer, and fall, offering ventilation and protection from rain.
- A-Frame Shelter: Simple to build and adaptable for milder weather conditions.
Ensure your chosen shelter matches the climate and season to stay comfortable and safe while in the wilderness.
Pros and cons of various shelter types
Each type of shelter comes with its own set of advantages and disadvantages. Here’s an overview:
1. Tarp Shelter:
- Pros: Lightweight, versatile, and easy to set up. Provides good airflow and visibility.
- Cons: Limited protection from cold and insects. May not offer privacy.
2. Hammock Tent:
- Pros: Elevates you off the ground, protecting you from wet and uneven terrain. Keeps you away from ground-dwelling insects.
- Cons: Requires sturdy trees or anchor points. Limited space and can be less comfortable for some.
3. Four-Season Tent:

- Pros: Provides excellent protection from the elements, including cold, wind, and snow. Spacious and comfortable.
- Cons: Heavier and bulkier. Overkill for warm seasons.
4. Snow Cave or Igloo:
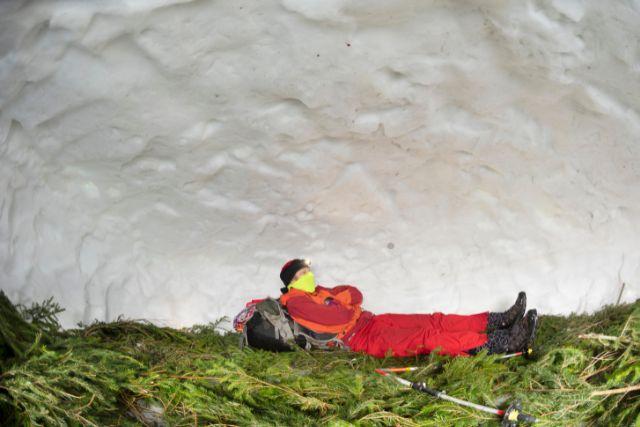
- Pros: Exceptional insulation against extreme cold. Can be constructed with readily available snow.
- Cons: Requires specific snow conditions and considerable effort to build.
5. Three-Season Tent:
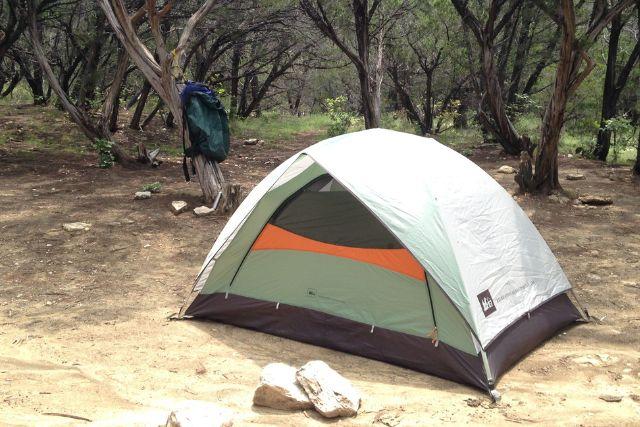
- Pros: Versatile for most seasons. Good balance between weight and protection. Provides privacy.
- Cons: Less suitable for extreme cold or heavy snow.
6. A-Frame Shelter:

- Pros: Easy to construct with minimal resources. Lightweight and adaptable.
- Cons: Provides limited protection in severe weather. May lack comfort and privacy.
Choose your shelter type based on the specific conditions you anticipate encountering in the wilderness. It’s often wise to have multiple shelter options to adapt to changing circumstances.
Gathering materials
Natural resources for shelter construction
When building a wilderness shelter, making the most of natural resources can be a lifesaver. Here are some valuable materials you can use:
1. Branches and Logs: Sturdy branches and logs are excellent for creating the framework of your shelter. Look for dry, fallen wood to avoid cutting live trees.
2. Leaves and Foliage: Thick layers of leaves and foliage can serve as insulation and waterproofing for your shelter. Use them as bedding or to thatch a roof.
3. Rocks and Stones: Rocks can be used as anchors for your shelter or for creating a windbreak. They also retain heat and can be used for cooking or warmth.
4. Snow and Ice: In snowy environments, snow can be piled up to create an insulating shelter, such as a snow cave or quinzhee.
5. Bark and Grass: Bark can be stripped from trees to make cordage or woven into mats for flooring. Tall grasses can be used for thatching or weaving.
6. Vines and Plant Fibers: These can be twisted together to make cordage for tying, lashing, and securing shelter components.
7. Animal Hides: If you have access to animal hides, they can provide excellent waterproofing and insulation.
8. Rocks and Mud: If your shelter is near a water source, you can use rocks and mud to build a simple stone shelter with a mud mortar.
9. Tarp or Plastic: If you have a tarp or plastic sheet in your survival kit, it can be a quick and effective way to create a shelter.
Always be mindful of your environment and the principles of Leave No Trace. Avoid damaging live vegetation unnecessarily and leave your shelter site as you found it when you’re done.
Essential tools for building a shelter
When building a wilderness shelter, essential tools include a sharp knife for cutting, a folding saw for efficient branch cutting, cordage for lashing components, a tarp or plastic sheet for waterproofing, a multi-tool or survival kit with extra implements, a fire starter for warmth and energy, a basic first aid kit for injuries, a headlamp or flashlight for low-light conditions, a compass and map for navigation, a space blanket for added insulation, duct tape for versatile fixes, and other tools as needed depending on your environment and shelter type.
Prioritize safety and plan your shelter construction carefully.
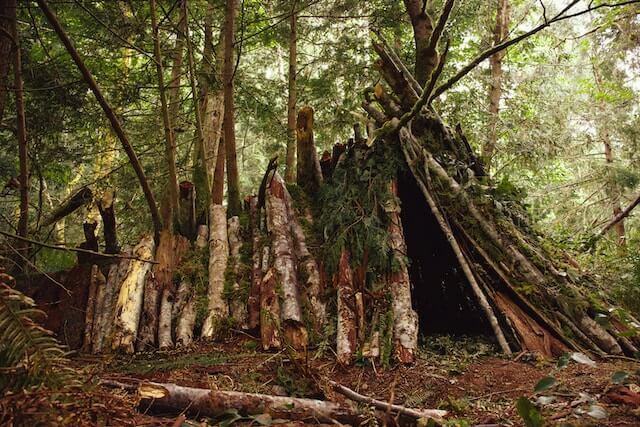
Constructing a basic debris shelter
Step-by-step guide for a simple lean-to shelter
Constructing a basic debris shelter involves these steps:
- Site Selection: Choose a suitable location with enough space and flat ground. Avoid areas prone to flooding, rockfall, or other hazards.
- Ridgepole Placement: Find a long, sturdy branch or log for the ridgepole. Position it at a height where you can sit comfortably beneath it.
- Support Sticks: Collect several shorter branches or logs to use as support sticks. Lean them against the ridgepole at an angle, creating the frame of your shelter.
- Roofing Material: Gather leaves, branches, pine needles, or any available natural materials. Layer them over the support sticks to create a thatched roof. Ensure it’s thick enough to provide insulation and waterproofing.
- Side Walls: For added protection from wind and rain, you can construct side walls by stacking branches or creating a lattice pattern using available materials.
- Insulation: Once your shelter is complete, add dry leaves, grass, or ferns inside as bedding for insulation and comfort.
- Entryway: Leave an opening for easy access but small enough to retain warmth. You can use additional materials to block wind from the entryway.
- Fire and Safety: If you plan to have a fire near your shelter, ensure it’s safely contained and well-ventilated. Always prioritize fire safety.
Remember that a debris shelter is a basic survival option and may not provide the same level of comfort as modern tents. It’s crucial to practice building one in a safe environment before relying on it in a wilderness emergency.
Tips for improving insulation and stability
To enhance the insulation and stability of your wilderness shelter, consider these tips:
- Layer natural materials: Increase insulation by adding layers of leaves, grass, or pine needles to the interior. These materials trap heat and create a warmer environment.
- Pack debris tightly: When thatching the roof, pack natural materials densely to create a more weather-resistant and stable covering.
- Elevate your shelter: Build a raised platform to keep your shelter off the cold ground, improving insulation and preventing moisture seepage.
- Windbreaks: Position your shelter near natural windbreaks like large rocks or trees to reduce heat loss and wind exposure.
- Seal gaps: Use available materials like moss or mud to seal any gaps or cracks in your shelter’s walls and roof, preventing drafts.
- Test it out: Spend a night in your shelter to identify any issues and make improvements as needed for better insulation and stability.
These tips will help you create a more comfortable and secure wilderness shelter for survival situations.
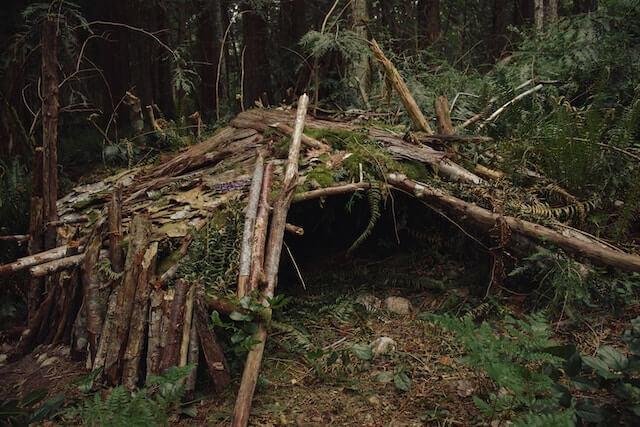
Building an elevated shelter
Advantages of elevated shelters
Elevated shelters offer several advantages for wilderness survival:
- Flood protection: Being above ground level keeps you dry during heavy rains or floods, ensuring your safety and comfort.
- Improved insulation: Elevation minimizes heat loss to the ground, providing better insulation and warmth during cold nights.
- Enhanced ventilation: Elevated shelters allow air to circulate underneath, reducing condensation and providing better airflow in warm weather.
- Pest deterrent: Raising your shelter off the ground can help deter pests like insects and small animals from entering.
- Visibility: Elevated shelters can make you more visible to rescue teams or passing aircraft in case of an emergency.
- Convenient storage: The space beneath an elevated shelter can be used for storing gear or firewood, keeping supplies dry and easily accessible.
When building an elevated shelter, consider these advantages to ensure a more comfortable and secure wilderness experience.
Creating a raised bed and platform
Creating a raised bed and platform in the wilderness involves these steps:
- Gather Materials: Collect sturdy branches or logs for the framework.
- Select Location: Choose a flat, dry area.
- Build the Frame: Lay out base logs and add perpendicular crosspieces.
- Add Bedding: Cover the frame with insulating materials like leaves or grass.
- Elevate the Platform: Optionally, build a stable platform for various activities.
- Test for Stability: Ensure the bed and platform can support weight.
- Maintenance: Regularly check and reinforce your shelter for comfort and safety during outdoor stays.
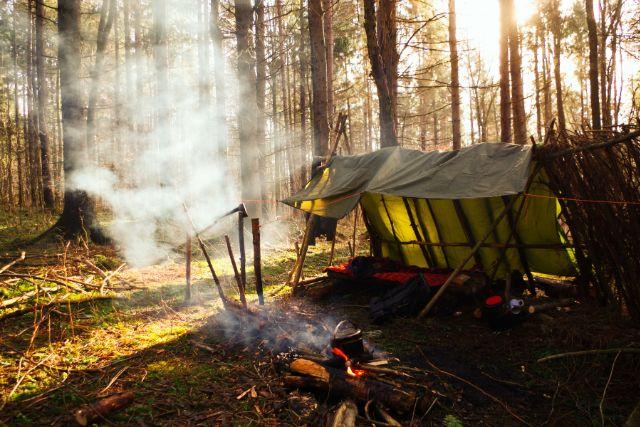
Crafting a waterproof shelter
Using tarps or ponchos for quick setups
Creating a waterproof shelter using tarps or ponchos can be a lifesaver in wet conditions. Here’s a simplified guide:
- Gather Materials: You’ll need a waterproof tarp or poncho, paracord or sturdy ropes, and stakes.
- Choose Location: Find a spot with good drainage, preferably elevated.
- Setup Framework: Tie one end of your paracord or rope between two trees, creating a ridgeline.
- Drape the Tarp: Lay your tarp over the ridgeline, allowing it to hang evenly on both sides.
- Secure Corners: Use stakes or heavy objects to secure the tarp’s corners to the ground.
- Adjust and Tighten: Tighten the ridgeline to make the tarp taut, preventing sagging.
- Seal Edges: If needed, use rocks, logs, or branches to secure the edges of the tarp for added protection.
- Flooring (Optional): Consider placing a ground cloth or debris beneath the shelter to keep the interior dry.
- Test for Leaks: Before settling in, check for any potential leaks or drips.
- Stay Dry: This shelter offers quick protection from rain or wind, making it a valuable skill for wilderness survival.
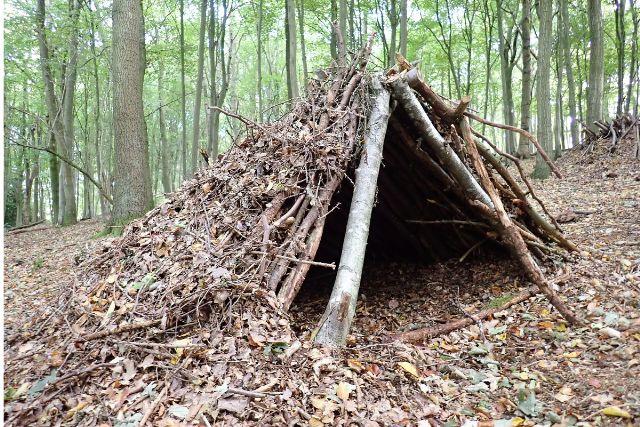
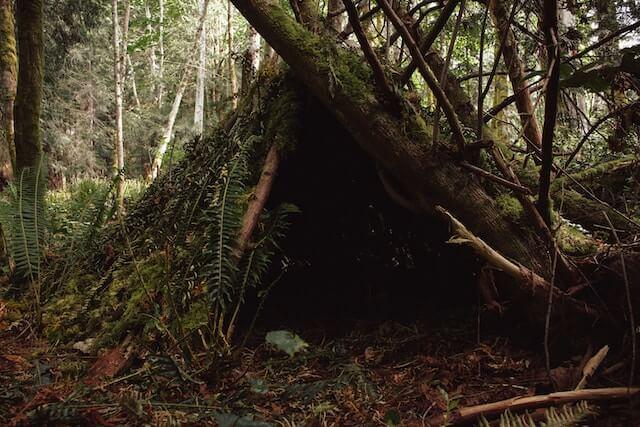
Constructing a sturdy A-frame shelter
Materials Needed:
- Two long, sturdy branches or logs
- Several shorter branches or sticks
- Cordage or vines for lashing
- Leaves, grass, or other debris for insulation
Construction Steps:
- Frame Preparation: Find two long branches or logs, each about twice your height. These will be the main support beams of your A-frame.
- A-Frame Assembly: Lay one of the long branches on the ground and prop the other against it to form an ‘A’ shape. Adjust the angle to your preference, but a steep slope is better for shedding rain and snow.
- Lashing: Use cordage or vines to tightly lash the two branches together where they intersect at the top. Ensure a secure connection to prevent the frame from collapsing.
- Crossbeam: Lay shorter branches or sticks horizontally across the A-frame to create a crossbeam. Lash these in place as well for added stability.
- Thatching: Cover the frame with leaves, grass, or other natural materials. Layer them densely to provide insulation and waterproofing. Ensure there are no gaps where wind or rain could penetrate.
- Flooring (Optional): If you have extra materials, consider creating a raised floor with sticks or branches to keep you off the ground.
- Entryway: Leave an opening at one end for your entrance. You can use additional branches or materials to fashion a door or flap for privacy and weather protection.
- Interior Arrangement: Arrange your sleeping area and belongings inside the shelter, keeping them elevated off the ground.
- Test for Comfort: Before settling in, make sure your A-frame is stable and that there are no leaks or drafts.
This A-frame shelter is durable and efficient, suitable for various weather conditions, and a valuable skill for survival situations.
Wilderness survival hacks for shelter construction
Using natural camouflage and concealment techniques
Creating a wilderness shelter that blends with the environment is essential for survival. Here are some tips:
- Choose Wisely: Select a shelter site hidden from plain view, such as behind rocks or bushes.
- Natural Materials: Use local vegetation for construction, matching colors and textures.
- Camouflage: Cover your shelter with moss, lichen, or bark to blend in.
- Irregular Shapes: Avoid straight lines in your shelter’s design.
- Earth Tones: Wear earthy-colored clothing and gear.
- Low Profile: Keep your shelter close to the ground.
- Minimal Disruption: Leave minimal signs of human activity.
- Silent Movements: Avoid loud noises during construction and movement.
- Light Control: Block light at night to stay hidden.
- Stay Vigilant: Continuously observe your surroundings for changes or threats.
Innovative shelter ideas for emergencies
When facing emergency situations, innovative shelter ideas can make a difference in survival. Here are some strategies to consider:
- Emergency blankets: Lightweight and compact, emergency blankets reflect body heat back to you and provide insulation.
- Tarp tents: Using a tarp and paracord, you can quickly create a makeshift tent to shield yourself from the elements.
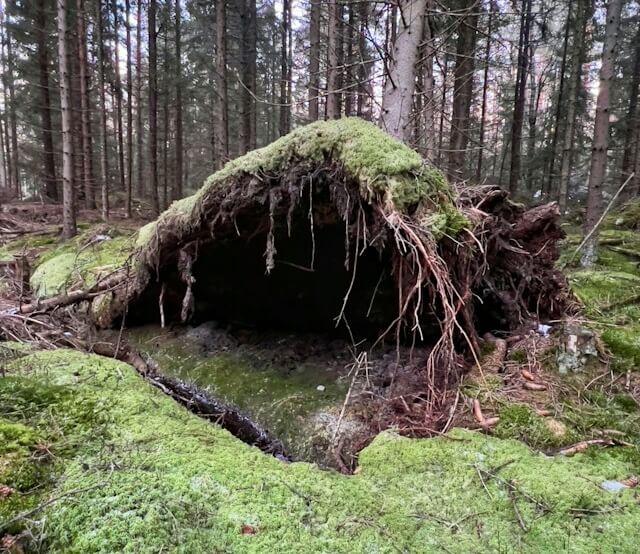
- Natural shelters: Utilize available natural resources like caves, rock formations, or fallen trees as impromptu shelters.
- Snow caves: In snowy environments, digging a snow cave can provide warmth and protection.
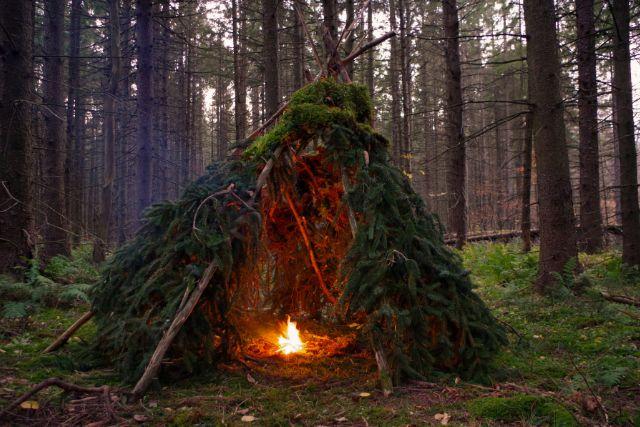
- Debris huts: Construct a debris hut using leaves, branches, and other natural materials, which can offer excellent insulation.
- Bivouac sacks: These waterproof and windproof bags are perfect for emergency situations and provide an extra layer of protection.
- Vehicle shelters: If you’re stranded with a vehicle, it can act as a shelter. Keep blankets and supplies in your car for emergencies.
- Portable emergency shelters: Compact, pop-up tents designed for emergencies are available on the market and can be invaluable.
Innovative shelter solutions can be a lifesaver when unexpected situations arise. It’s essential to be prepared and knowledgeable about these options for your safety and survival.
Shelter maintenance and repair
Regular upkeep of your shelter
Ensuring the durability of your wilderness shelter is vital for your safety and comfort. Here are some shelter maintenance and repair tips to keep in mind:
- Regular Inspection: Periodically inspect your shelter for signs of wear, damage, or weakness. This includes checking for tears, holes, or loose seams.
- Cleanliness: Keep your shelter clean. Remove dirt, debris, and moisture regularly to prevent mold and deterioration.
- Weatherproofing: Depending on your shelter type, consider applying waterproof coatings or sealants to maintain its ability to repel rain and moisture.
- Tarp Repairs: If using a tarp-based shelter, carry a repair kit containing adhesive patches or duct tape to quickly mend small tears or holes.
- Replacement Parts: For shelters with removable components, such as tent poles or stakes, carry spare parts to replace any damaged or lost items.
- Rope and Cordage: Check the condition of your ropes, cords, and guylines. Replace any frayed or damaged pieces to ensure structural integrity.
- Seam Sealing: If your shelter has sewn seams, apply seam sealer as needed to prevent leaks. This is particularly important for tents.
- Bug Net Repairs: Inspect bug netting for any holes or damage. Patch or replace sections to maintain insect protection.
- Zippers and Fasteners: Ensure that the zippers and fasteners on your shelter are functioning correctly. Lubricate zippers if they become stiff.
- Emergency Repair Kit: Always carry a small repair kit with essential tools like needles, thread, repair tape, and spare parts specific to your shelter type.
By maintaining and repairing your wilderness shelter, you increase its lifespan and reliability, ensuring it remains a dependable refuge during your outdoor adventures. Regular upkeep contributes to your safety and comfort while exploring the great outdoors.
Fixing damages and reinforcing weak points
Maintaining your wilderness shelter and addressing damages and weak points is crucial for ensuring its durability and reliability. Regular inspections are essential to identify areas that may be prone to wear and tear, such as stress points, seams, and anchor points.
If you notice tears or holes in your shelter’s fabric, use materials from your repair kit, such as adhesive patches, duct tape, or fabric repair tape, to mend them securely. Focus on ensuring that these patches adhere firmly for a dependable fix.
Pay close attention to stress points, such as corners and attachment points, which may weaken over time. Strengthen these areas by adding extra stitching or additional fabric to evenly distribute the stress.
Inspect the condition of your tent stakes, pegs, and guylines. Replace any bent or damaged stakes, and re-tension guylines as needed to maintain stability.
Seam sealing is critical to preventing water infiltration. Regularly apply seam sealer to sewn seams to maintain your shelter’s weather resistance.
Examine ropes and cordage for signs of fraying or damage. Replace any compromised lines to ensure reliable anchoring and support.
Keep zippers clean and lubricated to prevent jams and maintain smooth operation.
For shelters with frames or poles, check for damage or bending. Carry spare parts or repair sleeves to address any issues with the support structure.
Patch any holes or tears in the bug netting to preserve protection against insects.
Always carry an emergency repair kit containing tools and materials like needles, thread, repair tape, and spare parts tailored to your shelter type.
By promptly tending to repairs and maintenance, you’ll extend the lifespan of your wilderness shelter and rely on it as a dependable refuge during your outdoor adventures. Regular upkeep contributes to your safety and comfort in the wild.
Safety considerations
Fire safety near shelters
Maintaining fire safety near your wilderness shelter is essential for safety. Follow these guidelines:
- Keep a safe distance between your shelter and any open flames or campfires.
- Create a designated fire ring or pit away from your shelter.
- Clear the area around your fire pit of flammable debris.
- Never leave a campfire unattended and have means for firefighting nearby.
- Be aware of wind direction to prevent sparks near your shelter.
- Cook on stable surfaces away from flammable materials.
- Have a plan for fire emergencies and know escape routes.
- Follow local fire bans and educate your group on fire safety.
Prioritize safety when dealing with open flames in the outdoors.
Avoiding potential hazards in the wilderness
When building a wilderness shelter, prioritize safety by carefully selecting a location away from hazards, ensuring a clean water source without flooding risks, and being aware of local wildlife. Consider weather conditions, terrain, and the environment, and follow Leave No Trace principles to minimize your impact on the surroundings.
Conclusion
In conclusion, mastering the art of wilderness shelter building is a valuable survival skill. Whether you’re an outdoor enthusiast or a seasoned adventurer, understanding the fundamentals of shelter construction can make all the difference in a challenging situation.
By assessing your environment, choosing the right shelter type, gathering materials, and employing essential tools, you can create a safe haven in the wilderness. Regular maintenance and awareness of potential hazards further enhance your shelter’s effectiveness. With these skills in your repertoire, you’re better prepared to face the unpredictabilities of the great outdoors.
FAQs:
Can I build a shelter without any tools?
Yes, it’s possible to construct a shelter in the wilderness without tools, but having some basic tools like a knife or cordage can significantly ease the process. In the absence of tools, resourcefulness, and natural materials become crucial.
How long does it take to build a shelter in the wilderness?
The time needed to build a wilderness shelter varies depending on factors like your experience, shelter type, and available resources. With practice, a basic shelter like a lean-to or debris hut can be constructed in a few hours, while more elaborate structures may take longer.
What if I don’t have access to trees for shelter construction?
If trees are unavailable, consider using rock outcroppings, caves, or any sturdy natural features as a foundation for your shelter. In treeless environments, adaptability is key.
How can I ensure my shelter is well-insulated?
To enhance insulation, layer natural materials like leaves, ferns, and grass inside your shelter. Adding an insulating layer between you and the ground, such as pine needles or dry leaves, can help conserve warmth.
Are there any specific safety precautions I should take when building a shelter?
Yes, prioritize safety when building a shelter. Avoid overexertion to prevent dehydration, and be cautious of hazardous wildlife or insects in your chosen location. Additionally, check the weather forecast and be prepared for any adverse conditions that may arise during your shelter-building process. Always inform someone of your whereabouts and expected return time before venturing into the wilderness.